Battlefield: Hardline

Welcome to Cops & Robbers on the Battlefield - Woot!
The Battlefield series has long held to a military-focused theme and story line that has helped to establish it as one of the core and most popular military shooter series in the modern game library - but with the introduction of Hardline, the series takes a new direction.
In an abrupt if unexpected departure, the story focus for this newest entry in the series focuses on crime and police elements rather than military combat...
That is actually a bigger deal than you might think because while the focus shifted away from the traditional military story, the action elements remain pretty static in terms of weapons, tactics, and focus!
In Hardline the War on War has been replaced with the War on Crime - and police Special Response Units and criminals have replaced the allied and enemy military units - but in a more TV-focused way. We will get to that in a moment.
Ironically and largely thanks to the move by police departments large and small all over the country to reshape their departments into more military-like structures both in appearance, kit, and tactics, the big difference here lies almost exclusively on the basic desires of the units in play - which is to arrest rather than kill the enemy. Or at least that is what we hope their intentions are!
No, seriously, you score more points for slapping the cuffs on and taking the bad guy into custody than you do in fragging them. Just saying.
The game engine from Battlefield 4 has been upgraded, stroked, and creates the engine for Hardline - a development that can only be a good thing since it includes the many different environmental effects tech that was introduced in B4.
The game story is set in Miami, and its protagonists are a newly-minted Miami Metro Detective named Nick Mendoza, and his partner, Detective Khai Minh Dao, a veteran of the force.
While they are both usually by-the-book investigators, the impact that the drug abuse epidemic is causing on both sides of the law has slowly effected their perspective - and they are both reacting to having been influenced by the negative effects.

Call this an Arsenal for the Law - and Peace!
There are risks when a game with so long and strong a history takes a chance like this.
The possibility of a failure to deliver both structure and depth is the reason why very few popular game series developers will take this sort of a risk. Happily the wizards behind the Battlefield games opted to take that risk.
The results in Hardline are a game that not only delivers the same -- if not deeper -- intensity in terms of the story, characters, and premise, but it also introduces a pair of likeable characters in the protagonists who resonate well with the players without the developer having to spoon-feed the relationship.
The irony in finding such an immersive pair carrying the tin shields of Miami Vice detectives is not lost on most players.
In this modern age in which law enforcement is not only viewed by most citizens as potentially a threat to their liberty, it is also an age in which law enforcement has come to view all citizens with a measure of suspicion that tends to place them at least potentially as being an automatic part of the criminal element in society.
The general consensus of the average citizen is that you do not have to be guilty of a crime to end up arrested, largely because the police have stopped serving as peace officers, taking on a less flexible role as law enforcement officers.
The modern law enforcement community functions in an environment in which there is no longer any presumption of innocence. In fact the police no longer concern themselves with issues such as guilt or innocence, preferring to place the burden of determining that as part of the narrative that is controlled by the courts.

Vehicles make a major return to the Battlefield - to much Rejoicing!
Because of this, despite what might ordinarily be viewed as a lighter than usual character development process, the results pretty much speak for themselves. The cops are easier to like than the criminals largely because the cops at least most of the time act like they have functional brains, whereas the criminals are pretty oblivious to the ordinary risks in their profession...
Fortunately for players the game offers a level of play that is very similar to the previous games in the series, and while the criminals tend to be very predictable as long as the player themselves stays on top of the situation, when the player makes a mistake the criminal element can - and will - kick your ***.
Oddly the primary game play and story mode invests a measure of power in the shield carried by police that is more inline with the way that the police in our society would LIKE to believe it holds, but in reality that power is way over-blown and unrealistic.
Put it this way - if you are a cop and you hold up your badge and say freeze quick enough the bad guy does just that, and passively allows themselves to be arrested - a type of behavior that we know - we KNOW - is not vested in reality. Because they always run mates, always. Except when they don't. But here, they mostly don't.
That said, we think you will find that the game has everything you will want to find in a game in which you play the good guy, hunting down the bad guys, and the points system leans heavily towards the bed guy having their day in court.
Add in a much more robust focus on vehicles that is totally in-synch with the tradition of the Battlefield series and there really is nothing to find wanting there.
Battlefield Hardline is a first-person shooter developed by Visceral Games in collaboration with EA Digital Illusions CE, and is published by Electronic Arts. It includes versions for Microsoft Windows, PlayStation 3, PlayStation 4, Xbox 360, and Xbox One.
P0: Prologue
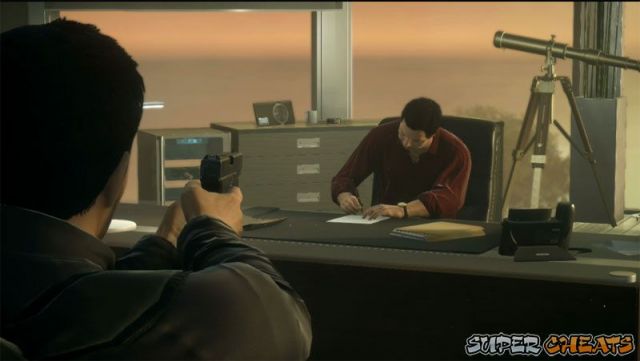
As the prologue begins you find yourself on board a prisoner transport bus and the implication is that a crooked cop has found his comeuppance. That is a flash-forward...
Now we are back in the hear and now and you are yourself - the protagonist - who is a Miami Vice detective. You are with your partner, standing outside of the door to a flat you are about to raid, and you and your partner are exchanging witty banter and conversation.
In case you are curious, yes, this is the very same agency that Crocket and Tubbs worked for in the TV Show Miami Vice. In fact more than once you will catch the members of the Vice Squad making jokes that reference the show.
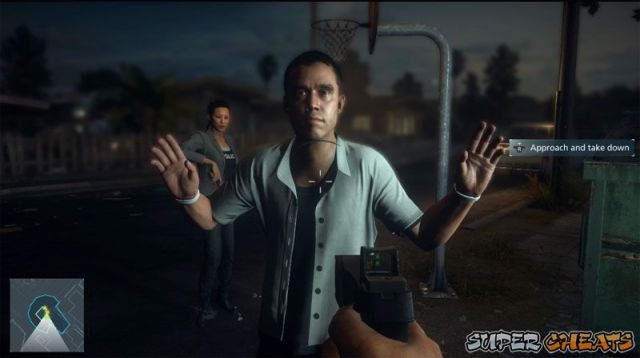
After you take the door you are prompted to place the first two suspects into custody... To do that you search and cuff them while your partner covers them. Actually you have to walk in front of your partner to do that which is really NOT the way that they really do it, but still...
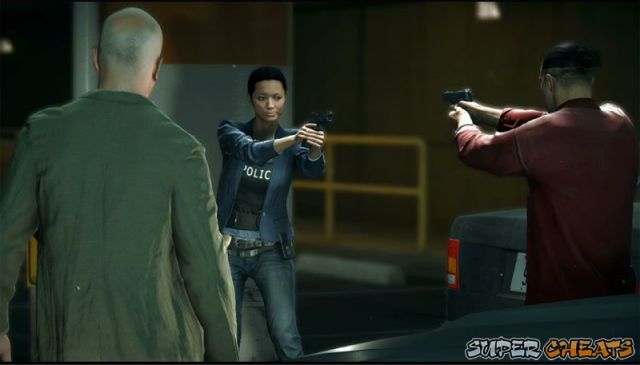
After you cuff the second perp a woman bursts out of the bathroom and starts shooting! You end up in the middle of a firefight as the other two perps pull their weapons and pretty much everybody dies!
There is some evidence on the floor you need to grab, and then a new perp arrives, sees you and runs. You give chase, eventually ending up in your car pursuing the perp through traffic until your partner shoots out his tyres causing him to wreck. You then take him into custody and the POV changes to that of the news media coverage of the events.
When that resolves you are at the PD and your commanding officer is briefing you...
If you gathered the impression that the game is structured sort of like a TV show, well that is a pretty accurate impression, as it is presented is an episodic structure.
This completes the Prologue, unlocking the Achievement On the Job (20g) Complete the Prologue in Single Player.
If you take anything away from those hints it should be that arrests - rather than shootings - are worth more to you in terms of XP and advancement. Just saying.
During the briefing from Captain Dawes you discover that you have been assigned a new female partner - a new partner who is not at all pleased to be paired up with you! After getting your basic marching orders you head out - in the passenger seat - with your new pard, you are to be on the lookout for a suspect with wants and warrants named Lawrence Kent.
As you cruise along pay attention to the conversation, as your new partner tips you on several important details about the case and how you should proceed. She also makes an observation about you that suggests you have been the subject of past conversations.
When you arrive at the entrance to the Projects you need to leave the car and proceed on foot - you are looking for a snitch named Brix - and as you make your way to your destination, following your partner's lead, check out how realistic this neighborhood looks!
You are prompted with instructions now on how to use your badge - which is to tap LB to flash it in order to freeze a suspect. The pop-up also warns you that failing to keep the suspect covered with your weapon will cause their Alert Meter to rise - which translates to cause them to get brave or do something very stupid.
You take down Brix to learn where Tap is - and as you round the corner you spot Tap's crew up ahead. This is when you get the pop-up that tells you about suspect awareness.
Basically you need to watch for the Suspects Alert Meter - and the Vision Cones on the minimap that can tell you where you can be and not be noticed.
As you make your way along the path behind the houses and through the yards you learn how to vault (A button) and crouch (B button), and sprint (push Left Joystick).
When you arrive at the gate crouch behind the wall to listen to the conversation, and then cross the alley to the next stop point where you learn how to throw something to distract a suspect (Back button).
You then make your way past the potential spotter to the courtyard, and get a pop-up for Distract-Separate - Takedown -- which is accomplished by tossing a shell casing to draw one of the perp's attention away in one direction then quietly approaching the other target and taking them down.
After you distract them you quietly approach them from behind and take them down with blows to the back of the head. Not nice - certainly not legal - but very effective!

Now that you have Tap cornered you can start interrogating him as you try to find out where Tyson is?
After applying significant pressure in the form of the threat of arrest for possession - and showing off your knowledge of his MO, you get Tap to help birddog Tyson - which means he gets wired up and sent in to locate the target.
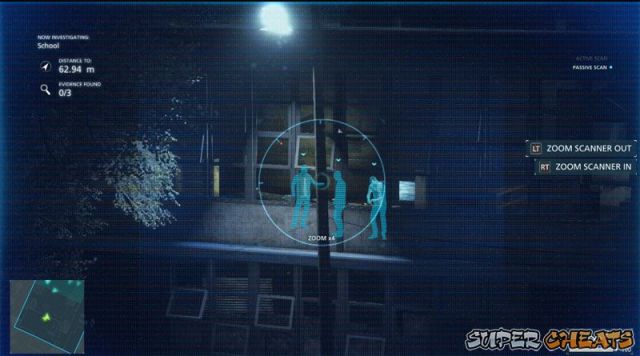
With your Snitch wired up and on the way in you are prompted to use your Scanner - a combination listening and spotting device (it has a powerful zoom lens). The Scanner is also connected to every local and federal database, so you can focus it on a suspect's face and analyze it to pull any information that is contained in those databases.
This is what you call high-tech cop kit!
As you are watching a new group of thugs shows up just after Tap makes contact - gunfire erupts and you have to commit - so try to scan as many of the enemy as you can in order to be able to better track them and then proceed down the stairs and into the ally!
At this point with several perps ahead of you a pop-up explaining how to Freeze Multiple Targets pops up -- you hit LB to flash your badge which will freeze up to three enemies -- you need to switch your aim between them in order to keep their meters from filling which will cause them to resist. The idea is to quickly take them down.
At the exit there is another perp you are prompted to scan to check for warrants. When you encounter perps with warrants an arrest will gain you far more XP than shooting them would. As luck would have it the bloke at the exit is the guy you were asked to be on the lookout for - so hey, bonus!
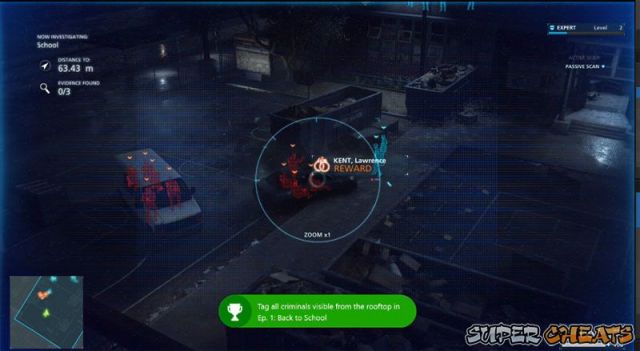
After the two car loads of thugs arrive, be sure that you Scan every single target and you will unlock the Achievement Motley Crew (25g) Tag all criminals visible from the rooftop in Ep. 1: Back to School.
In the process you will also Scan - actively - the Warrant Suspect.
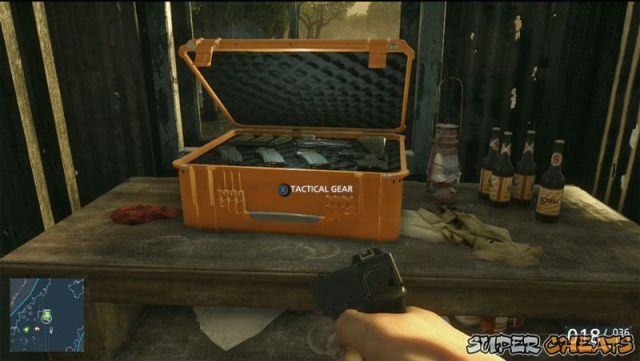
As you make your way into the School after taking out the enemy outside you can switch to non-lethal methods like the stun gun and, once you clear the building, you can collect the Tactical Box on the table for better kit.
The better you do in terms of actually taking the suspects in alive will reward you with a higher Expert Level, which in turn gets you better kit as your reward...
After you hit the Tactical Box and maybe select a new Primary Weapon (See Weapons Section for details on Weapons) you quip your Scanner and start looking at the evidence.
Case File
Case Files will be unlocked when new evidence is analyzed. Your scanner will buzz when evidence is nearby so you should analyze all that you can. There is a Case File on the desk and, when you tap down on the D-Pad you get to see the details.
The Hot Shot File - Box of Hot Shots. This is a new drug in the form of liquid cocaine. Among the evidence you find is a Ledger and Money. Hit the 'X' Button to play the audio clip comment.
On the sink there are Photos to scan that turn out to be surveillance files on your former partner, Detective Carl Stoddard!
In the next room you find the box of Hot Shots and in the room past that a video chat setup and laptop that, when you open it up, you get to chat with Tyson. He is not happy!
Finding all of this stuff rewards you in several ways. First, you unlock the Achievement Keep Digging, Detective (20g) Complete any case file in single-player.
You also unlock more weapons for the higher Tech Level - including the .38 Snub and .357 RS revolvers and the 37 Stakeout Shotgun.
Just to remind you, you can pick up the Found Weapons Glock 17 and 870P Magnum Shotgun here so you should.
On your way out there is an opportunity for you to take down a half-dozen suspects and pick up the Glock and the Pump Shotgun. After that you run to the car for a short ride to the traced location, then take the door as you did in the Prologue.
You almost get to kick in the door but now, Tyson opens it and as you start chatting with him a thug kicks in the door and shoots your partner, basically trapping you on the spot as you have to maintain pressure on her wound to keep her alive.
The whole time you are doing that you need to shoot the thugs that are coming through the windows and door - with a revolver for some reason... Not just any revolver either, but one that shoots .410 Shotgun Shells! Sweet!
Hold off the bad guys for long enough and the good guys roll in to the rescue. Your partner gets medical attention and you get the chance to be cool about it all.
That wraps up this episode and case very nicely thank you, and leads to the summary stage that happens between episodes.
You will have unlocked the Achievement Pressure Applied (20g) Complete Ep. 1: Back to School. You should also have unlocked You Tazed Him, Bro! (20g) Stun 5 criminals with the T62 CEW in single-player.
You can re-examine the evidence and hit 'X' to play the Conclusion scene which will sum-up the evidence and its value to you.
You are also shown your next set of objectives:
Suspects with Warrants: ROSADO, Javier and VOLKER, Gary.
Case Files: The Elmore Hotel Investigation and Hot Shot Supply Chain.
You may also access the Tactical Gear Menu from here - you should have the following unlocked if you followed the guide above:
Pistols: 92FS / P226 / CZ-75 / G17
Heavy Pistols: M1911A1
Revolvers: .38 Snub / .357 RS
Shotguns: 37 Stakeout / 870P Magnum
That is actually a pretty good outcome all things considered...
When you continue you get the CS that plays between episodes - and you find that your partner is back on duty (against doctor's advice) but still, cool... The Captain explains what has been happening and what IS happening, including a tip from an informant.
He wants you guys to pick the informant up so that he can be debriefed.
The Suspects you need to arrest for this Episode are ROSADO, Javier and VOLKER, Gary.
You ride to the meeting place and after you arrive you get the CS with the informant who is not happy about the fact that you two showed up instead of Captain Dawes...
Things start to go all pear-shaped when the informant starts to walk away and your partner makes a grab for the evidence, but then the scene is shattered by gunfire as a bunch of thugs attack!
Ideally what you will do - with your partner's help - is take down (arrest) as many of the thugs as you can, starting with the two you find on the next level up in the parking garage.
After you cuff those two, there are more to be found ahead - best approach is to sneak up and Taze them! Once you clear out the bandits here, you chase after the informant who leads you pretty much through the entire hotel.
When you reach the laundry you have to take out a group of about six thugs - but AFTER you do that, use your Scanner to locate the evidence here: A Box of Hot Shot. Hanging off a shelf nearby is a dry cleaned shirt that has a document pinned to it - the Care Instruction Memo - that is evidence you need to Scan.
In the room up the stairs with the Tactical Box on the table is a Drug Purchase List - which is the other Document evidence you need to detect and Scan.
As you make your way into the Lobby area take out the initial pair of thugs, and then take the hallway to the right. There is a door to an office there - go in and Scan the Answering Machine on the back desk (Physical Evidence). A door here leads to the check-in desk where there is a Tactical Box if you want to change weapons. You should hit that anyway to restock your Tazer.
Next to the Tactical Box is a Xerox Machine with a Tablet with IM Client on it. Scan that as it is another piece of Document Evidence.
At this point you should unlock the Achievements By the Book (20g) Do a Non-Lethal takedown on 10 criminals in single-player. and You're Getting Good at This (25g) Reach Expert Level 5 in single-player.
Make your way through the lobby and up the stairs to the Manager's Office on the second floor above the lobby, where you find your partner Kai basically beating the informant silly!

When you take down the Warrant Suspect Javier Rosada search his body for evidence -- Vial of Hot Shot.
While you are sorting out calming her down a new wave of thugs appears in the lobby downstairs, and they are searching for the informant. You will need to take them out, and then take the informant out of the hotel by the front door, and alive.
After you eliminate the threat get the informant into the truck outside and then drive over the causway, taking out any pursuit as needed, until you deliver the informant to the Captain. Who by the way is NOT happy.
You get your virgin lesson in ***-covering, and then you get to RTB!
At this point you will unlock the Achievement Bumpy Ride (20g) Complete Ep. 2: Checking Out.
You may also access the Tactical Gear Menu from here - you should have the following unlocked if you followed the guide above:
Pistols: 92FS / P226 / CZ-75 / G17
Heavy Pistols: M1911A1
Revolvers: .38 Snub / .357 RS
Machine Pistols: MAC-10
Shotguns: 37 Stakeout / 870P Magnum
SMG/PDW: MP5K / MPX / P90
Sniper Bolt Action: R700 LTR
Sniper Semi-Auto: SOCOM 16 / SR-25 ECC
The Suspects you need to arrest for this Episode are MINGUEZ, Luis, BELL, Thomas, and BROWN, Nathan.
You next find yourself in the Everglades - on an air boat... In the middle of nowhere... And you and Kai start chatting about what this is really all about.
You drive the air boat to the first two markers and Kai marks the bales with tracking darts. For the third bale you actually have to pull up to a dock and go n foot to where the chute is. Naturally after you tag the bale - after YOU tag it - a gator attacks you!

Follow the Joystick motions prompts on screen and then wait for your partner to rescue you!
After that head towards the platform and Kai will give you a Grappling Hook that she borrowed from SWAT... Use that to get up on to the platform, where you then make your way down the ramp to the next platform and hook up.
On one of the first sets of wooden platforms that you come to that DOES NOT have the rumble of evidence you will find the Scout Elite Sniper Rifle (this is one you have to FIND). To get to it what you need to do is Grapple to the taller Tower and then Zipline to the lower one across the way. The Scout Elite is on the bench of the lower tower.
Later as you work your way through the different bases you can also Found Weapon AKM, though if you miss it they are wicked common from here on... In the final part of this Episode when you are raiding the warehouse you can pick up the UMP-45.
This will unlock the Achievement Cape and Ears Not Included (25g) Climb a total of 10 meters with the grapple gun in single-player.
At the top of this one Kai gives you the Zipline launcher that you use to get over the fence ahead. Whip out your Scanner and you detect drug thugs ahead and an Exploded Bale that is evidence you need to Scan too.
Over by the docks where the drug thugs have their air boat is a barrel you need to Scan - a Toxic Barrel - that is Trace Evidence.
Use the crowbar to open the door to the shed on the docks - there is a Tactical Box in here - and a Radio whose frequency reveals more targets for you to check out...

As you approach the boat you get the pop-up that explains the Scanner Distance Meter - then you jump in the boat and head to the first marker, which turns out to be a Logging Camp and Saw Mill. You are prompted by Kai to Scan for alarms...
To the left is a group of Narcos and a piece of Trace Evidence - A Stained Fan Boat - so go ahead nad Scan that from the distance. You can also listen in on their conversation.
What I suggest you do is head back to the boat and use the Tactical Box there to equip the R700 LTR Sniper Rifle, add the 8X Scope and Suppressor to it, then use that to take out the Alarm Box.
You can then make your way through the camp and arrest everyone if you take your time and mind the vision cones!
After you take out the targets around the main sheds use your Scanner to Scan the Water Sampling Equipment - which is Trace Evidence.
With all of the threats now eliminated, Scan for more evidence and record the Note Pinned with Switchblade (Document Evidence). Inside the shed you find an ancient cell phone and read the text, then Scan the Manilla Envelope on the desk near the Tactical Box. That is another Document Evidence.
Head back to the boat and towards the next marker, which is a dock nearby with a wooden platform. Use the grapple to get on top and you Scan a Kilo of Cocaine which is Trace Evidence.
On the way to the next marker you see a Flag Icon - head to the dock there and Scan the Chemical Barrel (Trace Evidence) then continue on to the next Flag Marker - then climb the tower there and use the Zipline to get to the one across the water - you will find a Regional Zoning Map - which is Document Evidence.
After you collect the Regional Map, get in the boat and turn around then head past the shorter stand that had the map and you will see a nearby Flag Marker. Go to that and dock the boat, then climb the tower there with the Grapple, and Zipline across to the far (and shorter) tower. THAT is where you claim the coveted M/45, a WWII era personal defense weapon...
You will have unlocked the Achievement Fast Rope Expert (25g) Travel a total of 90 meters with the zipline crossbow in single-player.
As you head towards the next Marker you encouner a Flag Marker and a dock. Kai prompts you to head up to the Windmill and Scan the area. You do that and you listen in on Nathan Brown's conversation (and tag him). Scan all of the perps across the water.
You should unlock the Achievement Watched, Dawg (20g) Identify 10 warrants with the scanner in single-player.
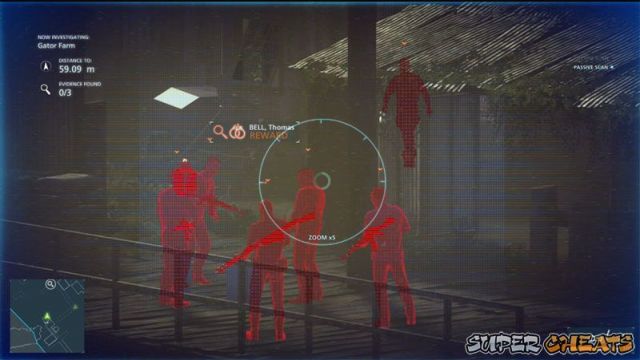
When you take down Nathan Brown search his body for another piece of Document Evidence, the Newspaper Story.
On the dock there is a Dead Gator that you need to Scam for Physical Evidence.
Inside the nearby shed is a pair of boots that have Torture Trace Physical Evidence on them that you need to Scan. That should be the last of the Evidence for this Episode - it does not complete the Evidence Set mind you, that will happen later in another Episode. But still, nice work mates!
After that just be sure you took out the rest of the thugs!
Follow the path to the marker - head inside the building and do the thing with the radio - you figure out where they are meeting, and that completes the objectives for the Gator Farm.
FYI there is a Tactical Box here so you can reload Ammunition or change your load-out if you want or need to...
Arresting these guys should unlock the Achievement Almost an Expert (25g) Reach Expert Level 10 in single-player. Well, assuming you have been following the guide.
At this point you can jump in the Air Boat and head away from the docks to trigger the next section.
From up top of the stands after you take out the guard there you should Scan all of the others - and Tag Remy so you can take him out arrested and get the bonus...
After you take out the rest of the crew Remy runs - you chase after him and break your way into the boat house, where you confront Remy and he tells you something strange before escaping...
When you reach the next location you battle your way up to the top floor only to have your previous partner come in at the last moment and kill the target! Not only that but you get all the confirmation you need that Stoddard is a bent cop! And Kai is too!
Oh man did not see that coming...
At this point you have completed the Episode and will unlock the Achievement Deal? What Deal? (20g) Complete Ep. 3: Gator bait. You may also have unlocked Damn Thing Doesn't Work (25g) Disarm 2 alarm boxes in single-player.
At this point you get the summary screen. You may also access the Tactical Gear Menu from here - you should have the following unlocked if you followed the guide above:
Pistols: 92FS / P226 / CZ-75 / G17
Heavy Pistols: 45T / M1911A1 / .40 Pro / Bald Eagle
Revolvers: .38 Snub / .357 RS / 410 Jury / 44 Magnum
Machine Pistols: MAC-10
Shotguns: 37 Stakeout / 870P Magnum
SMG/PDW: MP5K / MPX / UMP 45 / P90
Sniper Bolt Action: R700 LTR
Assault Rifle: AKM
Sniper Semi-Auto: SOCOM 16 / SR-25 ECC
EVANS, Philip
MILLER, Leonard
DIAZ, Frankie
GONZALEZ, Xavier
You need to be on the lookout for these guys so you can Scan and then arrest rather than execute.. That is to say take down in a strong manner - not! Seriously you need to arrest them, not kill them.
The active Case Files for this Episode are Internal Affairs, The Elmore Hotel, and Hot Shot Supply Chain.
You learned a lot during the last episode, including that your previous partner is bent. Thank God as you get your briefing now you learn that your current pard, Kai, is NOT bent after all!
When the Captain first started talking I thought he was dirty too - but thankfully it worked out that he - and Kai - are not. That was a big relief because hey, I have started to like these two.
The Cap wants us to head back to Nelson's Office to obtain more evidence - in the middle of a hurricane no less!
During the middle part of the Episode when you confront Stoddard and the unknown thugs attack the one that Stoddard kills in the office will drop an M16A3 -- pick that up - or don't, they get pretty common after this... Inside the Mall some of the thugs will drop the 45T Pistol, which is another Found Weapon.
When you arrive at the office Kai stays outside and you go inside - Open your Scanner and you will see that there are five pieces of Evidence here. Use the Scanner to locate them one at a time.
The first piece of Physical Evidence is a Gym Bag of Money in the office in the corner. There is Trace Evidence in the far side by the wall in Barrels of Dye.
Upstairs on the third floor in an office is a piece of Physical Evidence, a Talking Tamu-Tamu Doll.
On the desk in the office above - head up the nearby stairs - is an Elmore Plaza Business Card - that is Document Evidence and it closes the Elmore Hotel Investigation Case, so well done on that find!
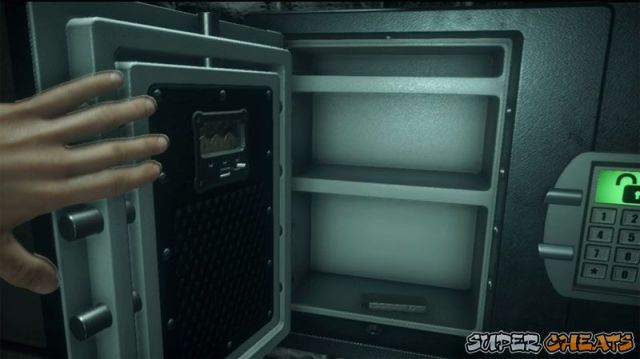
Now Scan the painting on the back wall of this office and you will see that someone has moved it recently. Close the Scanner and move the painting and you will see the safe concealed here. Open your Scanner and Scan the safe to see that the only numbers used are 1, 4, 5 and 8. That gives you a set number of combinations to try...
Hitting X will open the safe and score you a micro-recorder which is worth reporting to Kai - and you do.
On the way back you find a bin with Burner Phones in it - that is Physical Evidence in teh Internal Affairs Case. That is also the fifth of the five pieces of evidence for this location. Head back downstairs to talk to Kai...
She is in the shipping container in the loading bay - and you share your find with her. Then she shares her find with you - more of the anime dolls. She scores the address for the store that they are sold at - and that completes the objectives for this location so you head back to the car and drive to the next location...
Same deal as before - Kai holds down the fort outside and you make your way inside. As you reach the rood Kai calls to tell you that she has received a report of a suspicious van and is going to follow it, which means you have no backup here mates...
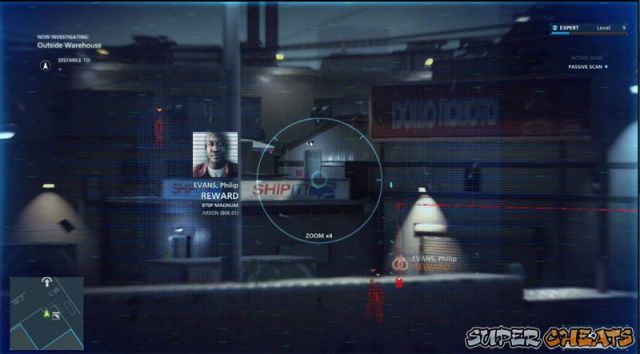
Use your Scanner and you will spot all fhe guards - and Scan one of the Suspects - Philip Evans, who is on your Warrants List.
There is a Tactical Box on the roof with you - you can use that to first grab the silenced Sniper Rifle and take out the Alarm Box from here - that way there is no way they will be sounding an alarm!
Then you can grab the Zipline, and make your way to the other side, where you take down the first of the guards.
After you take out the outside guards use the Crowbar to get into the warehouse where you listen in on Stoddards briefing...
First thing first, in the room you are in there is a piece of Document Evidence - a Poster for Tamu-Tamu - so Scan that. There is also a Tactical Box so you can reload your ammunition and choose more appropriate kit for this phase of the mission.
From the catwalk outside of this office Scan the bad guys to mark them, then Scan the Physical Evidence below on the shelf to obtain the Tamu-Tamu DVDs.
If you eavesdrop on the three thugs below you learn the story of how the anime got used as a money laundering source.
AFTER you take out all of the guards on the warehouse floor level, head into the office up a short flight of stairs in the corner to Scan a Document Evidence - Flyer for Tamu-Tamu - which is part of the Internal Affairs Case.
In that same office on the other desk is a piece of Document Evidence - Letter from Neltz's Business Manager -- the Scanning of which will also unlock the Achievement True Detective (25g) Complete 3 case files in single-player.
Now head downstairs and use the Crowbar to open the door - when you get in use the Scanner and you will note that there is an additional piece of Evidence to be found down here - track that to the Security Room - take out the guard there and then Scan the Crate of Hot Shot -- that is Trace Evidence for the Hot Shot Supply Chain Case and it is the final piece of evidence for this Episode.
Make your way to the Camera Station and use the controls to see the Grow House and Stoddard - as well as other thugs!

Okay thngs go sort of pear-shaped here - for one thing you enter the back room and find Stoddard standing over a dead person. Then he saves your life, the building gets set on fire, and oh yeah, there is an entire new group of thugs attacking!
Add to that you get a mayday call from Kai and, well, you are going to have to accept Stoddard's help mates!
When you reach the mall activate your Scanner to spot all of the enemy - including Leonard Miller, one of the blokes on your Warrants list. So yeah, just like in the warehouse we are going to peel this group like a grape, taking them down from the outside in, so that we can arrest them all.
As you are taking out the thugs be sure to disable the alarm box, then use the Crowbar to open the door to get in.
Once you are inside use the Security Cams in the Security Station just inside the door to scan the area to see the thugs. There is a Tactical Box here you can use to re-arm and change your load-out as needed.
With Stoddard's help you rescue Kai - and then together you take down the rest of the thugs, then make your way to the exit, hopefully avoiding getting crushed by the sign parts. When you finally get outside you very physically confront Stoddard.
You hand over the evidence you found in the safe to the Captain, and he summarizes the situation -- the Captain then reveals his treachery. Oh man, it is treachery all the way around! Stoddard is bent, the Captain is bent, and Kai is bent. And they have set you up to take the fall!
Kai asks you why you did not just take the damn money?!
Stoddard then arrest YOU! Did not see that coming!
At the end of that CS you unlock the Achievement Good Guys (20g) Complete Ep. 4: Case Closed.
You lose access to your weapons at this point as you are now on your way to prison so we will assess weapon load-outs when that privilege returns.
Tyson appears in a car next to the bus and BOOM! The bus goes bye-bye! When you wake up from your brief nap you are still shackled but are being rescued by one of the perps! He sets you free, and tells you that Tyson will meet you by the water tower.
There are several conditional Achievements for this Episode - one for stealing a Tazer from the back of a Police Car, another for not being spotted, and another for blowing up the Meth Lab. You should know about those so you can try hard to unlock them, right?

What makes this difficult is that the path you can take is very narrowly defined, so you have to take down a cop and get the Tazer as quick as you can and then use it carefully while making your way along the path that is open to you.
When you reach the building you have to go in through the window - that is the Meth Lab! Head into its basement, release the gas then light the flame and get OUT!
Blowing up the Lab unlocks the Achievement Knock Knock (25g) Blow up the Meth Lab in Ep. 5: Gauntlet.
When you blow the Lab the best route out seems to be through the hole in the side wall and up the ladder, then make your way to the porch of the house ahead as that is partly covered and protects you from the chopper.
Get the cop that is patrolling this area to walk past by throwing a rock, then Taze them, then haul butt across the street, through the lot and into the storm tunnels. Go through the narrower tunnel and out the other side, then carefully make your way towards the Tower.
When you arrive you meet up with Tyson, who fills you in on the situation... He provides yo with a light and tells you what to do with it - flash it three times fast, which you do, but then the chippers arrive!
You need to get to the marker on the map but, you also need to avoid being seen by either the choppers OR the patrolling cops. That means dodging from cover to cover strategically. There is really no way we can help you do that - you have to do it instinctively.
After yo hook up with Tyson again he takes you through a mine and to a waiting car where you meet up with Kai - Kai?!
You hear about what has happened in the past three years since you were locked up...
At this point you will unlock the Achievement You Probably Have Questions (20g) Complete Ep. 5: Gauntlet. If you managed to get through undetected you will also have unlocked Graceful Exit (25g) Don't get spotted in the Ep. 5: Gauntlet. If you took a Tazer from the back of a Police Car rather than by knocking out a cop, you will also have unlocked Their Own Medicine (25g) Steal a T62 CEW from the back of a police cruiser in Ep. 5: Gauntlet.
At this point you get back access to your load-out so we will cover what you SHOULD have unlocked to this point...
Pistols: 92FS / P226 / CZ-75 / G17
Heavy Pistols: 45T / M1911A1 / .40 Pro / Bald Eagle
Revolvers: .38 Snub / .357 RS / 410 Jury / 44 Magnum
Machine Pistols: 93R / G18C / TEC-9 / MAC-10
Shotguns: 37 Stakeout / 870P Magnum / SPAS-12 / Double Barrel Shotgun
SMG/PDW: MP5K / MPX / UMP 45 / P90
Sniper Bolt Action: R700 LTR
Assault Rifle: M416 / M16A3 / AKM
Carbine: RO933 / SG553
Sniper Semi-Auto: SOCOM 16 / SR-25 ECC
At this point you should have unlocked ALL of the Gadgets and the Melee. So what you will be working on from here on are the rest of the firearms.
The Suspects with Warrants for this Episode are:
KWOK, Edgar
MUN, James
OH, Ji-hun
Though really, why you should care is a bit confusing!
Oh and we resume looking for Evidence starting with this Episode too... Hey, it may be good to get back to being a cop after all that prison time, right?
As the mission begins you get treated to a video of Captain Dawes, who appears to be soliciting investors for a new business model. As Tyson and Kai lay out the facts to you, it turns out that Dawson is a bigger douche than we thought!
Kai explains to you about the case that they are working - and their informant - and Kai and you come to a sort of understanding.
The perps leave and Kai sends you inside to crack the computer - so Tyson drives up and you go in, then use your Scanner to find a Tactical Box and, on the desk, a Purchase Order for Bianchi that is your first Document Evidence for the new case, Power Play.
Inside the back office is a second Document Evidence - Letter from Kang's Wife -- which is also for Power Play. That takes care of the two pieces of evidence for this location.
Now head to the computer on that desk and insert the USB Stick. That begins the data transfer but wait!! You must have tripped a silent alarm because you got goons on the way in mates!
Make a run for the car, survive the semi ramming then fight your way through the parking lot to the replacement car. Get in and drive straight ahead into the river canal and have you your escape via that viaduct.

As you drive away as fast as you can you talk with Kai over the radio or phone - whatever - and she explains you have to rescue Boomer - and gives you directions to the next location.
There is a Tactical Gear Kit in the boot of the car you are in if you need to reload and re-arm. Open your Scanner to learn that there are four more pieces of Evidence here at this location.
The easy way to do this one is to grab the Grapple as one of your gadgets then head into the building and up the stairs. Use the Scanner to spot the targets across the way, then exit the building through the front loading door, and use the Grapple to get to the top of the building across the street that is next door to the yard. At this point you should then use a silenced pistol to shoot the Alarm Box - that may get the attention of one of the goons, but what is he going to do about it??
You will have ID'd two of the Warrant subjects in the yard below - James Mun, and Ji-hun Oh. Be an idea to arrest those two, right? Actually it would be an idea to arrest ALL of them, but you may not be able to depending on how things play out.
Whether you Taze or arrest the Suspect in the back (Mun) area make sure you search him to obtain the Document Evidence - Boomer Photo.
After you take down the remaining thugs head inside the garage to Scan the Designer Luggage - which is Trace Evidence -- then use the crane controls to lower the car and release Boomer from the boot!
Boomer gives you his keycard - or you take it depending on how you look at it - then you let yourself through the gate and go to clear the next warehouse.
Use the stairs on the right-side to enter the office, taking down the thug there. Use Scanner to mark the thugs below - including the third Warrant Suspect Kwok, and Scan from here the Physical Evidence below -- K-Pop Album.
On a workbench below is Physical Evidence -- Remote Detonator -- which is the final piece of evidence for this location.
At this point you should have unlocked the Achievement One Good Cop (25g) Reach Expert Level 15 in single-player.
You then head out the back door to find Boomers car and snag his laptop from the boot but, just as you do that a thug you did not see attacks and as you blow his head apart with his own pistol the warehouse explodes!
You then have to deal with half-dozen thugs, then make your way back to the first warehouse yard, where you face even more of the thugs before you make a run for the car in the street and discover that Boomer is in the back seat!

You just need to escape the thugs - head straigth then left, avoid the train and when you drop into the river viaduct turn right and GO!
Once you are in the river you have to drive and avoid being shot to heck until you end up swapping seats with Tyson, at which point you hang out the window and shoot it out with the gunmen in other cars as Tyson gets you through the area and into the Metro Tunnels - at which point you have to shoot up the final car in order to escape without getting creamed by the train!
Once you do that you get a semi-resolving CS in which Boomer sets you straight on the operation, and then you end up at yet another warehouse, where you make your way to the tracks.
At this point you should Scan the area ahead to mark the thugs - and note that there are three pieces of Evidence in this location for you to find.
Now you can peel this grape from the outside in, starting from left-to-right taking down the thugs. Follow the left-hand thug into the office and take him down, then Scan the Document Evidence on the desk -- Photo of Lily Kang and Roark -- and then take out the rest of the guys in the warehouse.

Inside you will Scan Physical Evidence on one of the cars -- Bomb Under Kang's Bianchi -- then some Trace Evidence in the back of the warehouse -- Palette of Hot Shot. That concludes the evidence for this location and this Episode.
You just need to take Kang and his two guards down and then you force your way into the back room and discover a massive amount of Coke!
Tyson opts to steal the Coke - but his plan does not work out as a train sort of gets in the way... Heh. It is snowing in LA!
After that the crew hooks up with Kai and that nicely wraps up this Episode! You unlock the Achievement Snow Blind (20g) Complete Ep. 6: Out of Business.
You should have unlocked the following weapons:
Pistols: 92FS / P226 / CZ-75 / G17
Heavy Pistols: 45T / M1911A1 / .40 Pro / Bald Eagle
Revolvers: .38 Snub / .357 RS / 410 Jury / 44 Magnum
Machine Pistols: 93R / G18C / TEC-9 / MAC-10
Shotguns: 37 Stakeout / 870P Magnum / SPAS-12 / Double Barrel Shotgun
SMG/PDW: MP5K / MPX / UMP 45 / P90
Sniper Bolt Action: R700 LTR300 Knockout / AWM
Assault Rifle: M416 / M16A3 / AKM
Carbine: RO933 / SG553 / AKS-74U / G36C
Sniper Semi-Auto: SOCOM 16 / SR-25 ECC / SAIGA .308 / PTR-91
BRILLER, Cameron
THOMAS, Marvin
The opening CS has Boomer working on the files from the auto lot - the idea being that you hope to find some incriminating evidence on Dawes. Boomer finds a party invite among the data, and you and Kai decide to check it out.
The next CS is Kai planting a bomb on a power box, as you make your way into the house after the power is blown.
Once you get inside your first stop should be the office down the hall where you find some Document Evidence -- Shipping Labels -- then you make your way upstairs and plant the bug in the conference room.
Unfortunately the group arrives early and you and Kai have to duck into the closet... As you watch through the doors you see your ex-partner delivering his pitch.
In the garage you will find more Physical Evidence in the form of a White Van,
Enter the gym and use the secret panel in the wall to access the controls for the secret door to gain access to the secret room. On the wall inside is a Wall of Photos -- which qualifies as Document Evidence.
Finally after you arrest / capture Cameron Briller search his body for the final piece of Document Evidence -- Safe Combination -- to finish off this part of the location.
WARNING: Be sure you do NOT exit by the double doors at the far end of the house - which lead to the Terraces which is the second location - BEFORE you collect all of the Evidence from the main house because IF you do, you cannot get back.
Once you do have all the evidence collected though, it is time to hit those double doors and move on to the Terrace Location, which has both its own guards and its own set of evidence.
Slowly make your way down, arresting each of the thugs as you reach them. Head into the greenhouse and arrest the thug there, then Scan the Trace Evidence there -- Tanks of Tear Gas -- before finishing the thugs on this level and heading down to the level below, where you enter the shooting range.
You can optionally use the BBQ to take out the chef - which unlocks the Achievement BYOB (25g) Use the BBQ to take out the chef in Ep. 7: Glass Houses.
After you take out the thug here, search the gun room for Physical Evidence -- SWAT Flack Jackets -- and then head to the range stands and more Physical Evidence -- Box of SS190 Cartridges. Finally on the floor next to the ammo is more Physical Evidence -- Rifle Suppressors.
That wraps up all of the evidence for this location in the Episode.
Continue on your way to the Pool House, taking out the thugs along the way, making sure that you disable the Alarm Panel straight away!
At the marker use the Crowbar to get through the door then head upstairs and open the safe beside the bed, Scanning the Document Evidence inside -- File Inside Safe -- which completes the evidence for this location and the Episode.
Now plant the phone in the money case, then you have your confrontation with the man! In full big screen glory! He issues his threat and then Kai puts her gun to his head then pistol whips him! Woof!
Right so you just need to take cover and shoot to survive until Kai shows up.- after which you get a CS and another moment in which you come to terms - sort of...
That concludes this Episode, and unlocks the Achievement Hollyweird (20g) Complete Ep. 7: Glass Houses.
You should have unlocked the following weapons:
Pistols: 92FS / P226 / CZ-75 / G17
Heavy Pistols: 45T / M1911A1 / .40 Pro / Bald Eagle
Revolvers: .38 Snub / .357 RS / 410 Jury / 44 Magnum
Machine Pistols: 93R / G18C / TEC-9 / MAC-10
Shotguns: 37 Stakeout / 870P Magnum / SPAS-12 / Double Barrel Shotgun
SMG/PDW: MP5K / MPX / UMP 45 / P90
Sniper Bolt Action: R700 LTR300 Knockout / AWM
Assault Rifle: M416 / M16A3 / AKM
Carbine: RO933 / SG553 / AKS-74U / G36C
The Episode begins with Tyson very impressed by the amount of damage you caused to Roark's house - the Boomer enters to celebrate the success of tracking the money. Which is traced back to Miami... To a fortress-like building.
Boomer scores you the special kit you need - an auto-safe-cracking tool -- so you head out into the bush to pick it up.

You have a moment with Boomer during the CS, and then his buddy shows up... Boomer introduces you and then you learn that you have to go to a place called The Compound - where there might be trouble...
She asks you to drive to the Compound - and you do. Along the way you hear an interesting story... Unfortunately her dad gets the drop on you - and you get taken prisoner! Oh man Boomers ex knew all along. And it turns out that Boomer is also being captured.
There is an optional Achievement for this one: A Craftsman's Tools (25g) Find your weapons in Sovereign Land before instigating combat in the trailer park.
As you make your way through the tunnels you will encounter a bloke working on the electrics. Take him down and you find a weapon and the cuff keys - hey, progress!
When you get to the first group of guys try to take the one in the area on the left out, then grab the shotgun from the table and take the four in the main room out, and recover yoru Scanner!

Once you get outside you get a CS and decide to get your kit back...
Follow Boomer to the trailer with the radios and Scan the Document Evidence in the next room -- Bomb Blueprint.
Remember you need to get your kit back first before you start combat if you want to unlock that Achievement...
Head in through the ditch and hole in the fence, take down the guy just inside, then quickly disable the Alarm Panel and grab the Tazer from the picnic table. Take cover in the trailer on the left to find the final Hot Shot Evidence -- Hot Shot Lab -- and Scan it to complete that Case.
Make your way around the perimeter of the park to the trailer with the Tactical Box and you unlock the Achievement A Craftsman's Tools (25g) Find your weapons in Sovereign Land before instigating combat in the trailer park.
Nicely done you! Now in theory you could just leave, but hey, there is a Wanted fella in here and besides don't you want to take out the rest of these freaks? Get a little payback? I know I DO!
After you complete taking down all of the thugs search the trailers for the rest of the evidence. In one you will find Document Evidence -- Boomer Dossier -- while in the trailer on top of the trailer you will find more Physical Evidence in the form of a Torture Room. In the same place you will find more Physical Evidence -- Cell Phone.
Be sure you search the body of the thug with the Warrant - as you will find Physical Evidence -- ATF Agent's Badge --which is appears belongs to a missing Agent! That concludes the evidence for this location.
You can pretty much leave now unless you need to search for weapons you have not yet collected (if there are any).
Boomers ex is waiting for you with a car -- and during the conversation she pulls a gun on you and tells you she is turning you in - but hey, just kidding! Then everything goes pear-shaped as you actually DO get attacked by the bad guys!
Basically you need to survive this attack and take out the attackers... After you survive the attack you get another CS with the ex...

Before you move on get the Physical Evidence -- License Plate -- and the ATF Agent's Grave.
Drive to the airport and head inside the hanger where you will find a piece of Trace Evidence - Ricin Bomb. That completes the Boomer Case.
While Boomer looks to your new ride you are supposed to get the bot - but when you get on the roof you discover you have company! Fortunately you ALSO find an anti-aircraft gun! Hey! This should be fun!
So yeah that was totally fun but, once we get the Brute the building gets shelled! Fortunately there is a tank outside we can grab - seriously - a tank... Using the tank you have to take out some choppers - Get to the Chopper! And another tank,
After that just run to the plane and that ends the Episode!

You unlock the Achievement From Their Cold Dear Hands (20g) Complete Ep. 8: Sovereign Land.
You should have unlocked the following weapons:
Pistols: 92FS / P226 / CZ-75 / G17
Heavy Pistols: 45T / M1911A1 / .40 Pro / Bald Eagle
Revolvers: .38 Snub / .357 RS / 410 Jury / 44 Magnum
Machine Pistols: 93R / G18C / TEC-9 / MAC-10
Shotguns: 37 Stakeout / 870P Magnum / SPAS-12 / Double Barrel Shotgun
SMG/PDW: MP5K / MPX / UMP 45 / K10 / P90 / UZI / FMG9
Sniper Bolt Action: R700 LTR300 Knockout / AWM
Assault Rifle: M416 / M16A3 / AKM
Carbine: RO933 / SG553 / AKS-74U / G36C
Battle Rifle: SCAR-H / HCAR
Sniper Semi-Auto: SOCOM 16 / SR-25 ECC / SAIGA .308 / PTR-91
There are two Suspects with Warrants for this one - KELLY, Dereck and STARNES, John.
Right! So we are back in Miami and on a speedboat too! How Miami Vice! You are waiting for Tyson but he got lost... Finally gets to you via the computer and you head in!
When you reach the van you open the door and Boomer jumps in - and you have another conversation about whether this is really a good idea?
Tyson drops the cable and you get the C4 from Boomer, then you an Kai approach the building. You may as well arrest the pair of guards in the street - the ones in the lobby cannot see you do it. And that eliminates them.
In the alley behind the building there are two guards you take out - and near the dumpster there is some Evidence -- Box of Books.
Inside one of the guards is Dereck Kelly so it would be an idea to arrest rather than kill him, right?
Head along the left side of the building and up the stairs then take out the guard on that level, before sniping the two guards behind the desk with silenced headshots then quickly running down and arresting the Warrant Suspect.

Now make your way to the Security Camera Room in back and arrest the Guard there, and then Scan the Document Evidence on the desk there -- Staffing Chart.
With the guard force now taken out try the lift to learn it is locked down - then head to the lobby security station and Scan the pad to figure out the code. Unlock the lifts and head there - and ride the lift to 20;.
Once there you need to take out the guards and Scan the evidence on the desk in back -- Letter from Chicago Politician.
After that head to the balcony taking out the guard there and then shoot the Alarm Panel with your silenced weapon before Scanning the guards below and revealing the other Warrant - John Starnes.
Now peel this grape from the outside in as you take down the guards and then once you have accomplished that start sweeping for Evidence. In the corner office upstairs is a Revenue Sketch. In an office you have to go through several doors to reach is an Email from Dawes's Computer. Collecting that email completes the Power Play Case.
In that same office is a Photograph of Dawse' Wife. Be sure to Scan that. The final evidence for this location is on the body of the Warrant Suspect - Notice of Transfer - so be sure to search him!
Now join Kai and use the Crowbar to open the door and hook up with Tyson, who you pass on the C4 to.

Tyson is on his way to deliver the package, while you and Kai head back to the private office and Crowbar the lift door to the private lift... You have another convo with Kai in which you have to reassure her and you fail.
You have your masks and breathers on and as planned the lift shaft floods!
You swim up and let yourself in, then use the tablet to open the door so Tyson can enter. You guys have a nice convo and then set the Brute working on the vault - once you find it!
While looking you Scan some evidence -- Bank Website -- and then upstairs in the bedroom a Photo of Dawes' Dying Wife. That takes care of the evidence for this location.
You open the bust by the fire and voila! Vault! Tyson hooks up the Brute and you get started waiting for the Brute to do its thing... In the meantime you get attacked by few waves of enemy and then the Brute does its thing. Sadly Tyson opens the vault and triggers a booby trap!
You have your escape on the wire -- or you TRY. But a chopper sort of messes that up and you eventually end up in the street - where you fight and run and fight some more until you reach the boat, at which point that ends the Episode.
You unlock the Achievement Some Damn Fine Fireworks (20g) Complete Ep. 9: Independence Day. If you were acting fast when you swung back into the building if you shot the thugs there while swinging you unlocked Real Action Hero (25g) Kill a criminal in Independence Day from mid air after escaping the penthouse.
You should have unlocked the following weapons:
Pistols: 92FS / P226 / CZ-75 / G17
Heavy Pistols: 45T / M1911A1 / .40 Pro / Bald Eagle
Revolvers: .38 Snub / .357 RS / 410 Jury / 44 Magnum
Machine Pistols: 93R / G18C / TEC-9 / MAC-10
Shotguns: 37 Stakeout / 870P Magnum / SPAS-12 / Double Barrel Shotgun
SMG/PDW: MP5K / MPX / UMP 45 / K10 / P90 / UZI / FMG9
Sniper Bolt Action: R700 LTR300 Knockout / AWM
Assault Rifle: M416 / M16A3 / AKM
Carbine: RO933 / SG553 / AKS-74U / G36C
Battle Rifle: SCAR-H / HCAR / HK51 / SA-58 OSW
Sniper Semi-Auto: SOCOM 16 / SR-25 ECC / SAIGA .308 / PTR-91
The Suspects with Warrants for this Episode are:
WHITE, Howard
FELDMAN, Lyle
FOSTER, Craig
So you totally know you are walking into a trap... There really is no question about that, right? The real question is can you turn the trap against Dawes?
A quick Scan ahead after you get off the boat should reveal at least two guards at the tree line. If you target them and listen to their conversation you learn what their loads are and their instructions form the pair at the tree line.
Use the plants for cover to get close to them and then when one of them kneels down, run up and flash your badge and arrest both. Inside the shed near them is a Tactical Box if you need to change your load-out.
Remember there are three Suspects with Warrants here that you do want to arrest so no indiscriminate Rambo action here, right?
Head up on the rocks where the tower is and you can Scan the compound below - ID Howard White, and the rest of the guards. You also spot the Alarm Panel and its sirens.
From left to right you should spot - in addition to Howard White - eight (8) armed guards. This is another grape we want to peel from the outside in, so look for isolated targets, sneak in and take them down.
It would be an idea to go get the silenced Sniper Rifle and take out that Alarm Panel form here...

After you take out the thugs and arrest White, head into the building with the office and Scan the Document Evidence in the printer - FAX from Neil Roark - and that takes care of the evidence for this location. There is a Tactical Box nearby if you need to reload or change kit, then head for the next Icon on the map!
When you reach the rise just past another Tactical Box, Scan the guards below to ID Lyle Feldman - mark him so you don't accidentally kill him!
After you take out the guards and capture the Warrant Suspect, being sure to disable the Alarm Panels, use the Scanner to locate the next Document Evidence -- Summons from the IRS -- which is the only evidence for this location and is found in the Cabanas on the water.
That just leaves two more Documents for the entire collection. Sweet!
So at this point we can head for the marker in two ways -- the first is to head up to the compound and battle our way in, but there IS an alternative! You could instead had down to the shore on the left and, using the Grapple climb up the pair of terraces here, after taking out the two guards at the base, and thus unlock the Achievement Social Climber (25g) Find the hidden access to the mansion grounds in Ep. 10: Legacy.
There is actually a THIRD option present by the way... You see if you locate the dirt bike you can use THAT to jump into the grounds - thus unlocking the Achievement Dare Devil (25g) Jump the dirt bike into the mansion grounds in Ep. 10: Legacy.
To do that head for the small cluster of buildings with the radio tower and crane that is above the commercial compound that has a group of guards and Craig Foster -- one of the Warrant Suspects. Since Foster is there you will want to go ahead and clear out that area even though technically you can reach the crane area without doing so. We aim for complete victory so it needs to be done!
That area is the Utility Complex and it has one of the pieces of evidence we want, so if you are already above it backtrack down, otherwise start peeling this grape and taking down the thugs!
On a desk in a building inside the compound is the next piece of evidence -- Surveillance Log -- which you should grab after you take out the guards here and arrest the Warrant Suspect.
With that done head to the crane area and head up the ramp to the left - the bike is on the path below that little covered hut. Jump on then ride it along the path to the end to jump into the Estate and unlock the Dare Devil Achievement... Though honestly considering how many guards there are here I would have taken the back way in myself :)
Either way - no matter which choice you make - you want to take out the grunts and make your way to the office by following the markers on the map. Make your way into the house and then down to the lower level, following the marker for the evidence.
To get to the evidence you have to go all the way up to the roof to get access to a small room on it - where you can claim the Dossier on Cpt. Hector Mendoza -- which is the final piece of evidence in the collection and the taking of which unlocks the Achievement World's Greatest Detective (50g) Complete all case files in single-player.
Make your way to the marker on the map and meet up with Captain Dawes - who tells you that he is unarmed and just wants to talk...
Dawes makes his pitch - trying to appeal to what he thinks is your baser nature - then you execute his butt! Good on ya! Nice one! Saw THAT coming!
Now go to the desk and read the paper there - that was what Dawes was writing - and he was not at all surprised you killed him!
Follow the directions and open the passage then open the vault below, and you discover that Dawes basically left you a fortune!
You unlock the Achievement Served Cold (20g) Complete Ep. 10: Legacy.
When you click to play the next Episode what you get instead is the credits... Once the credits play out you will also unlock the Achievements (depending on the difficulty you played on) Super Cop (25g) complete all single-player episodes on Veteran difficulty / Case Closed (25g) Complete all single-player episodes on Officer Difficulty.
If you arrested all of the Warrant Suspects you will have unlocked Bring 'em to Justice (25g) Capture all Warrants alive in single-player.
Completing the game will also unlock the Hardline Difficulty Setting. At this point you have also unlocked ALL of the weapons.
Now we are back in the hear and now and you are yourself - the protagonist - who is a Miami Vice detective. You are with your partner, standing outside of the door to a flat you are about to raid, and you and your partner are exchanging witty banter and conversation.
In case you are curious, yes, this is the very same agency that Crocket and Tubbs worked for in the TV Show Miami Vice. In fact more than once you will catch the members of the Vice Squad making jokes that reference the show.
Your first successful arrest
After you take the door you are prompted to place the first two suspects into custody... To do that you search and cuff them while your partner covers them. Actually you have to walk in front of your partner to do that which is really NOT the way that they really do it, but still...
After you cuff the second perp a woman bursts out of the bathroom and starts shooting! You end up in the middle of a firefight as the other two perps pull their weapons and pretty much everybody dies!
There is some evidence on the floor you need to grab, and then a new perp arrives, sees you and runs. You give chase, eventually ending up in your car pursuing the perp through traffic until your partner shoots out his tyres causing him to wreck. You then take him into custody and the POV changes to that of the news media coverage of the events.
When that resolves you are at the PD and your commanding officer is briefing you...
If you gathered the impression that the game is structured sort of like a TV show, well that is a pretty accurate impression, as it is presented is an episodic structure.
This completes the Prologue, unlocking the Achievement On the Job (20g) Complete the Prologue in Single Player.
P1: Back to School
During the transition to Part One you are shown pop-ups that clue you in on some of the criteria that is used to judge best success - like identifying and arresting suspects with open warrants, and finding the evidence that is necessary to complete Case Files - which can result in unlocking special weapons.If you take anything away from those hints it should be that arrests - rather than shootings - are worth more to you in terms of XP and advancement. Just saying.
During the briefing from Captain Dawes you discover that you have been assigned a new female partner - a new partner who is not at all pleased to be paired up with you! After getting your basic marching orders you head out - in the passenger seat - with your new pard, you are to be on the lookout for a suspect with wants and warrants named Lawrence Kent.
As you cruise along pay attention to the conversation, as your new partner tips you on several important details about the case and how you should proceed. She also makes an observation about you that suggests you have been the subject of past conversations.
Gathering intel in the Projects while exceeding your comfort zone
The Projects
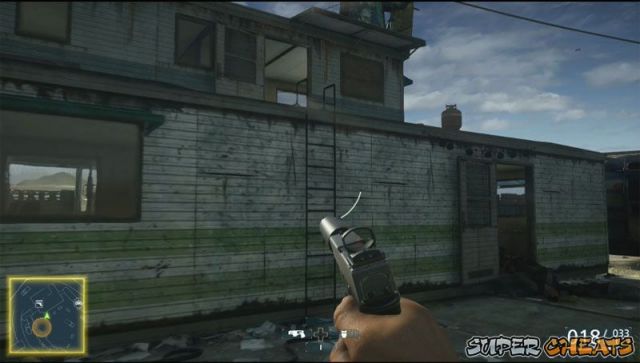
When you arrive at the entrance to the Projects you need to leave the car and proceed on foot - you are looking for a snitch named Brix - and as you make your way to your destination, following your partner's lead, check out how realistic this neighborhood looks!
You are prompted with instructions now on how to use your badge - which is to tap LB to flash it in order to freeze a suspect. The pop-up also warns you that failing to keep the suspect covered with your weapon will cause their Alert Meter to rise - which translates to cause them to get brave or do something very stupid.
You take down Brix to learn where Tap is - and as you round the corner you spot Tap's crew up ahead. This is when you get the pop-up that tells you about suspect awareness.
Basically you need to watch for the Suspects Alert Meter - and the Vision Cones on the minimap that can tell you where you can be and not be noticed.
As you make your way along the path behind the houses and through the yards you learn how to vault (A button) and crouch (B button), and sprint (push Left Joystick).
When you arrive at the gate crouch behind the wall to listen to the conversation, and then cross the alley to the next stop point where you learn how to throw something to distract a suspect (Back button).
You then make your way past the potential spotter to the courtyard, and get a pop-up for Distract-Separate - Takedown -- which is accomplished by tossing a shell casing to draw one of the perp's attention away in one direction then quietly approaching the other target and taking them down.
After you distract them you quietly approach them from behind and take them down with blows to the back of the head. Not nice - certainly not legal - but very effective!
An introduction to Tap will lead you to Tyson... Sort of.
Tap's Couch
Now that you have Tap cornered you can start interrogating him as you try to find out where Tyson is?
After applying significant pressure in the form of the threat of arrest for possession - and showing off your knowledge of his MO, you get Tap to help birddog Tyson - which means he gets wired up and sent in to locate the target.
The Scanner
With your Snitch wired up and on the way in you are prompted to use your Scanner - a combination listening and spotting device (it has a powerful zoom lens). The Scanner is also connected to every local and federal database, so you can focus it on a suspect's face and analyze it to pull any information that is contained in those databases.
The Scanner in your smartphone is hooked to all the databases
This is what you call high-tech cop kit!
As you are watching a new group of thugs shows up just after Tap makes contact - gunfire erupts and you have to commit - so try to scan as many of the enemy as you can in order to be able to better track them and then proceed down the stairs and into the ally!
At this point with several perps ahead of you a pop-up explaining how to Freeze Multiple Targets pops up -- you hit LB to flash your badge which will freeze up to three enemies -- you need to switch your aim between them in order to keep their meters from filling which will cause them to resist. The idea is to quickly take them down.
At the exit there is another perp you are prompted to scan to check for warrants. When you encounter perps with warrants an arrest will gain you far more XP than shooting them would. As luck would have it the bloke at the exit is the guy you were asked to be on the lookout for - so hey, bonus!
After the two car loads of thugs arrive, be sure that you Scan every single target and you will unlock the Achievement Motley Crew (25g) Tag all criminals visible from the rooftop in Ep. 1: Back to School.
In the process you will also Scan - actively - the Warrant Suspect.
As you make your way into the School after taking out the enemy outside you can switch to non-lethal methods like the stun gun and, once you clear the building, you can collect the Tactical Box on the table for better kit.
The better you do in terms of actually taking the suspects in alive will reward you with a higher Expert Level, which in turn gets you better kit as your reward...
A full Scan unlocks an Achievement and introduces Warrant Suspects
The Office
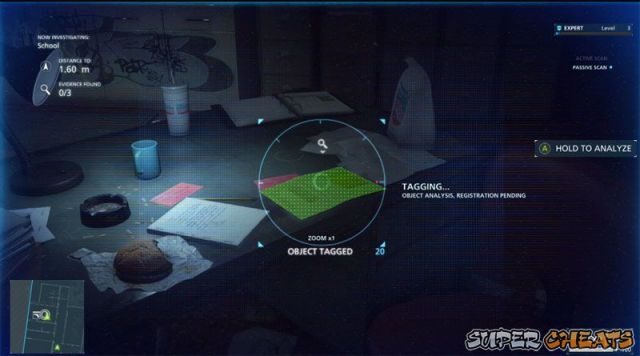
After you hit the Tactical Box and maybe select a new Primary Weapon (See Weapons Section for details on Weapons) you quip your Scanner and start looking at the evidence.
Case File
Case Files will be unlocked when new evidence is analyzed. Your scanner will buzz when evidence is nearby so you should analyze all that you can. There is a Case File on the desk and, when you tap down on the D-Pad you get to see the details.
The Hot Shot File - Box of Hot Shots. This is a new drug in the form of liquid cocaine. Among the evidence you find is a Ledger and Money. Hit the 'X' Button to play the audio clip comment.
On the sink there are Photos to scan that turn out to be surveillance files on your former partner, Detective Carl Stoddard!
In the next room you find the box of Hot Shots and in the room past that a video chat setup and laptop that, when you open it up, you get to chat with Tyson. He is not happy!
Finding all of this stuff rewards you in several ways. First, you unlock the Achievement Keep Digging, Detective (20g) Complete any case file in single-player.
You also unlock more weapons for the higher Tech Level - including the .38 Snub and .357 RS revolvers and the 37 Stakeout Shotgun.
Just to remind you, you can pick up the Found Weapons Glock 17 and 870P Magnum Shotgun here so you should.
On your way out there is an opportunity for you to take down a half-dozen suspects and pick up the Glock and the Pump Shotgun. After that you run to the car for a short ride to the traced location, then take the door as you did in the Prologue.
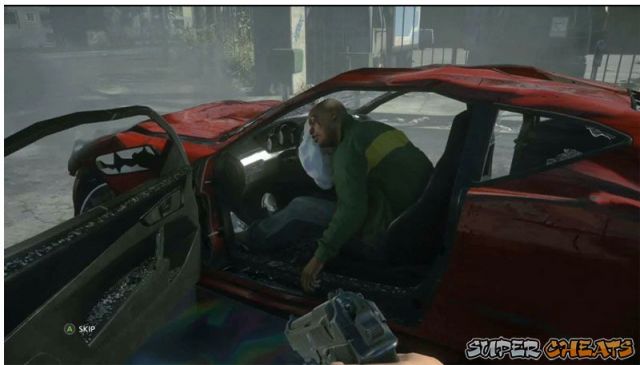
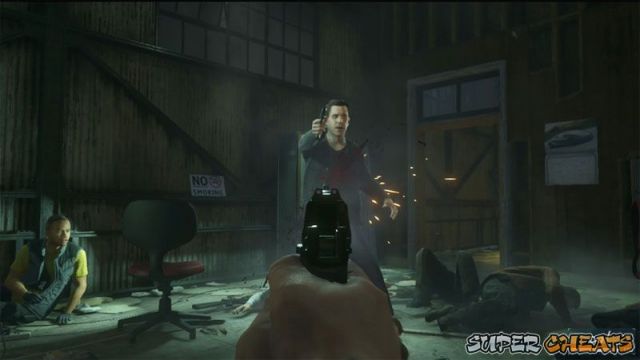
You almost get to kick in the door but now, Tyson opens it and as you start chatting with him a thug kicks in the door and shoots your partner, basically trapping you on the spot as you have to maintain pressure on her wound to keep her alive.
The whole time you are doing that you need to shoot the thugs that are coming through the windows and door - with a revolver for some reason... Not just any revolver either, but one that shoots .410 Shotgun Shells! Sweet!
Hold off the bad guys for long enough and the good guys roll in to the rescue. Your partner gets medical attention and you get the chance to be cool about it all.
That wraps up this episode and case very nicely thank you, and leads to the summary stage that happens between episodes.
Gathering the first piece of evidence opens the case
You will have unlocked the Achievement Pressure Applied (20g) Complete Ep. 1: Back to School. You should also have unlocked You Tazed Him, Bro! (20g) Stun 5 criminals with the T62 CEW in single-player.
You can re-examine the evidence and hit 'X' to play the Conclusion scene which will sum-up the evidence and its value to you.
You are also shown your next set of objectives:
Suspects with Warrants: ROSADO, Javier and VOLKER, Gary.
Case Files: The Elmore Hotel Investigation and Hot Shot Supply Chain.
You may also access the Tactical Gear Menu from here - you should have the following unlocked if you followed the guide above:
Pistols: 92FS / P226 / CZ-75 / G17
Heavy Pistols: M1911A1
Revolvers: .38 Snub / .357 RS
Shotguns: 37 Stakeout / 870P Magnum
That is actually a pretty good outcome all things considered...
When you continue you get the CS that plays between episodes - and you find that your partner is back on duty (against doctor's advice) but still, cool... The Captain explains what has been happening and what IS happening, including a tip from an informant.
He wants you guys to pick the informant up so that he can be debriefed.
P2: Checking Out
BEFORE we begin I want to emphasize that the goal here is to take as many of the perps down ALIVE as possible. You get far more cred for arresting them than killing them. Take that to heart, because the XP you pick up is very valuable!The Suspects you need to arrest for this Episode are ROSADO, Javier and VOLKER, Gary.
You ride to the meeting place and after you arrive you get the CS with the informant who is not happy about the fact that you two showed up instead of Captain Dawes...
Things start to go all pear-shaped when the informant starts to walk away and your partner makes a grab for the evidence, but then the scene is shattered by gunfire as a bunch of thugs attack!
Ideally what you will do - with your partner's help - is take down (arrest) as many of the thugs as you can, starting with the two you find on the next level up in the parking garage.
After you cuff those two, there are more to be found ahead - best approach is to sneak up and Taze them! Once you clear out the bandits here, you chase after the informant who leads you pretty much through the entire hotel.
An armed stand-off is not the best way to start an adventure....
When you reach the laundry you have to take out a group of about six thugs - but AFTER you do that, use your Scanner to locate the evidence here: A Box of Hot Shot. Hanging off a shelf nearby is a dry cleaned shirt that has a document pinned to it - the Care Instruction Memo - that is evidence you need to Scan.
In the room up the stairs with the Tactical Box on the table is a Drug Purchase List - which is the other Document evidence you need to detect and Scan.
As you make your way into the Lobby area take out the initial pair of thugs, and then take the hallway to the right. There is a door to an office there - go in and Scan the Answering Machine on the back desk (Physical Evidence). A door here leads to the check-in desk where there is a Tactical Box if you want to change weapons. You should hit that anyway to restock your Tazer.
Next to the Tactical Box is a Xerox Machine with a Tablet with IM Client on it. Scan that as it is another piece of Document Evidence.
At this point you should unlock the Achievements By the Book (20g) Do a Non-Lethal takedown on 10 criminals in single-player. and You're Getting Good at This (25g) Reach Expert Level 5 in single-player.
Make your way through the lobby and up the stairs to the Manager's Office on the second floor above the lobby, where you find your partner Kai basically beating the informant silly!
Using your scanner to track the location of thugs should become second nature
When you take down the Warrant Suspect Javier Rosada search his body for evidence -- Vial of Hot Shot.
While you are sorting out calming her down a new wave of thugs appears in the lobby downstairs, and they are searching for the informant. You will need to take them out, and then take the informant out of the hotel by the front door, and alive.
After you eliminate the threat get the informant into the truck outside and then drive over the causway, taking out any pursuit as needed, until you deliver the informant to the Captain. Who by the way is NOT happy.
You get your virgin lesson in ***-covering, and then you get to RTB!
At this point you will unlock the Achievement Bumpy Ride (20g) Complete Ep. 2: Checking Out.
You may also access the Tactical Gear Menu from here - you should have the following unlocked if you followed the guide above:
Pistols: 92FS / P226 / CZ-75 / G17
Heavy Pistols: M1911A1
Revolvers: .38 Snub / .357 RS
Machine Pistols: MAC-10
Shotguns: 37 Stakeout / 870P Magnum
SMG/PDW: MP5K / MPX / P90
Sniper Bolt Action: R700 LTR
Sniper Semi-Auto: SOCOM 16 / SR-25 ECC
P3: Gator Bait
The CS for this Episode starts in the Captain's office where he briefs you on what they learned from the informant - Leo provided some good information it seems... But then he splits. After Kai leaves the Captain tries to explain the reality of your situation to you.The Suspects you need to arrest for this Episode are MINGUEZ, Luis, BELL, Thomas, and BROWN, Nathan.
You next find yourself in the Everglades - on an air boat... In the middle of nowhere... And you and Kai start chatting about what this is really all about.
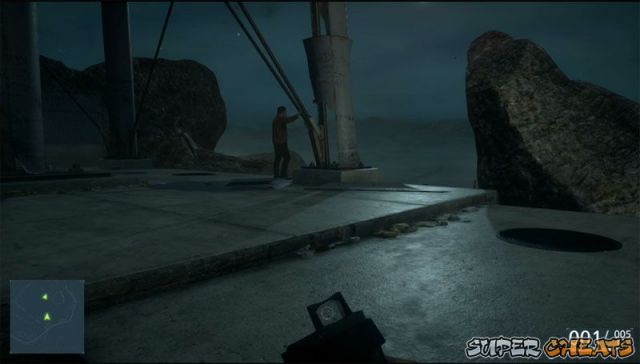
You drive the air boat to the first two markers and Kai marks the bales with tracking darts. For the third bale you actually have to pull up to a dock and go n foot to where the chute is. Naturally after you tag the bale - after YOU tag it - a gator attacks you!
Heading into the Glades in search of drugs and evidence
Follow the Joystick motions prompts on screen and then wait for your partner to rescue you!
After that head towards the platform and Kai will give you a Grappling Hook that she borrowed from SWAT... Use that to get up on to the platform, where you then make your way down the ramp to the next platform and hook up.
On one of the first sets of wooden platforms that you come to that DOES NOT have the rumble of evidence you will find the Scout Elite Sniper Rifle (this is one you have to FIND). To get to it what you need to do is Grapple to the taller Tower and then Zipline to the lower one across the way. The Scout Elite is on the bench of the lower tower.
Later as you work your way through the different bases you can also Found Weapon AKM, though if you miss it they are wicked common from here on... In the final part of this Episode when you are raiding the warehouse you can pick up the UMP-45.
This will unlock the Achievement Cape and Ears Not Included (25g) Climb a total of 10 meters with the grapple gun in single-player.
At the top of this one Kai gives you the Zipline launcher that you use to get over the fence ahead. Whip out your Scanner and you detect drug thugs ahead and an Exploded Bale that is evidence you need to Scan too.
Over by the docks where the drug thugs have their air boat is a barrel you need to Scan - a Toxic Barrel - that is Trace Evidence.
Use the crowbar to open the door to the shed on the docks - there is a Tactical Box in here - and a Radio whose frequency reveals more targets for you to check out...
Among the sights of the Glades is a downed drug plane!
As you approach the boat you get the pop-up that explains the Scanner Distance Meter - then you jump in the boat and head to the first marker, which turns out to be a Logging Camp and Saw Mill. You are prompted by Kai to Scan for alarms...
To the left is a group of Narcos and a piece of Trace Evidence - A Stained Fan Boat - so go ahead nad Scan that from the distance. You can also listen in on their conversation.
What I suggest you do is head back to the boat and use the Tactical Box there to equip the R700 LTR Sniper Rifle, add the 8X Scope and Suppressor to it, then use that to take out the Alarm Box.
You can then make your way through the camp and arrest everyone if you take your time and mind the vision cones!
After you take out the targets around the main sheds use your Scanner to Scan the Water Sampling Equipment - which is Trace Evidence.
With all of the threats now eliminated, Scan for more evidence and record the Note Pinned with Switchblade (Document Evidence). Inside the shed you find an ancient cell phone and read the text, then Scan the Manilla Envelope on the desk near the Tactical Box. That is another Document Evidence.
Tactical Boxes are strategically placed for reloading and changing gear
Head back to the boat and towards the next marker, which is a dock nearby with a wooden platform. Use the grapple to get on top and you Scan a Kilo of Cocaine which is Trace Evidence.
On the way to the next marker you see a Flag Icon - head to the dock there and Scan the Chemical Barrel (Trace Evidence) then continue on to the next Flag Marker - then climb the tower there and use the Zipline to get to the one across the water - you will find a Regional Zoning Map - which is Document Evidence.
After you collect the Regional Map, get in the boat and turn around then head past the shorter stand that had the map and you will see a nearby Flag Marker. Go to that and dock the boat, then climb the tower there with the Grapple, and Zipline across to the far (and shorter) tower. THAT is where you claim the coveted M/45, a WWII era personal defense weapon...
You will have unlocked the Achievement Fast Rope Expert (25g) Travel a total of 90 meters with the zipline crossbow in single-player.
As you head towards the next Marker you encouner a Flag Marker and a dock. Kai prompts you to head up to the Windmill and Scan the area. You do that and you listen in on Nathan Brown's conversation (and tag him). Scan all of the perps across the water.
You should unlock the Achievement Watched, Dawg (20g) Identify 10 warrants with the scanner in single-player.
Each location presents a different set of challenges
When you take down Nathan Brown search his body for another piece of Document Evidence, the Newspaper Story.
On the dock there is a Dead Gator that you need to Scam for Physical Evidence.
Inside the nearby shed is a pair of boots that have Torture Trace Physical Evidence on them that you need to Scan. That should be the last of the Evidence for this Episode - it does not complete the Evidence Set mind you, that will happen later in another Episode. But still, nice work mates!
After that just be sure you took out the rest of the thugs!
Follow the path to the marker - head inside the building and do the thing with the radio - you figure out where they are meeting, and that completes the objectives for the Gator Farm.
FYI there is a Tactical Box here so you can reload Ammunition or change your load-out if you want or need to...
Arresting these guys should unlock the Achievement Almost an Expert (25g) Reach Expert Level 10 in single-player. Well, assuming you have been following the guide.
At this point you can jump in the Air Boat and head away from the docks to trigger the next section.
It turns out that Leo never made it out of the area... Yikes!
From up top of the stands after you take out the guard there you should Scan all of the others - and Tag Remy so you can take him out arrested and get the bonus...
After you take out the rest of the crew Remy runs - you chase after him and break your way into the boat house, where you confront Remy and he tells you something strange before escaping...
When you reach the next location you battle your way up to the top floor only to have your previous partner come in at the last moment and kill the target! Not only that but you get all the confirmation you need that Stoddard is a bent cop! And Kai is too!
Oh man did not see that coming...
At this point you have completed the Episode and will unlock the Achievement Deal? What Deal? (20g) Complete Ep. 3: Gator bait. You may also have unlocked Damn Thing Doesn't Work (25g) Disarm 2 alarm boxes in single-player.
At this point you get the summary screen. You may also access the Tactical Gear Menu from here - you should have the following unlocked if you followed the guide above:
Pistols: 92FS / P226 / CZ-75 / G17
Heavy Pistols: 45T / M1911A1 / .40 Pro / Bald Eagle
Revolvers: .38 Snub / .357 RS / 410 Jury / 44 Magnum
Machine Pistols: MAC-10
Shotguns: 37 Stakeout / 870P Magnum
SMG/PDW: MP5K / MPX / UMP 45 / P90
Sniper Bolt Action: R700 LTR
Assault Rifle: AKM
Sniper Semi-Auto: SOCOM 16 / SR-25 ECC
P4: Case Closed
As this Episode begins - I totally wanted to call it a mission just now - you learn that there are four Suspects with Warrants:EVANS, Philip
MILLER, Leonard
DIAZ, Frankie
GONZALEZ, Xavier
You need to be on the lookout for these guys so you can Scan and then arrest rather than execute.. That is to say take down in a strong manner - not! Seriously you need to arrest them, not kill them.
The active Case Files for this Episode are Internal Affairs, The Elmore Hotel, and Hot Shot Supply Chain.
You learned a lot during the last episode, including that your previous partner is bent. Thank God as you get your briefing now you learn that your current pard, Kai, is NOT bent after all!
You didn't take the money...
When the Captain first started talking I thought he was dirty too - but thankfully it worked out that he - and Kai - are not. That was a big relief because hey, I have started to like these two.
The Cap wants us to head back to Nelson's Office to obtain more evidence - in the middle of a hurricane no less!
During the middle part of the Episode when you confront Stoddard and the unknown thugs attack the one that Stoddard kills in the office will drop an M16A3 -- pick that up - or don't, they get pretty common after this... Inside the Mall some of the thugs will drop the 45T Pistol, which is another Found Weapon.
When you arrive at the office Kai stays outside and you go inside - Open your Scanner and you will see that there are five pieces of Evidence here. Use the Scanner to locate them one at a time.
The first piece of Physical Evidence is a Gym Bag of Money in the office in the corner. There is Trace Evidence in the far side by the wall in Barrels of Dye.
Upstairs on the third floor in an office is a piece of Physical Evidence, a Talking Tamu-Tamu Doll.
On the desk in the office above - head up the nearby stairs - is an Elmore Plaza Business Card - that is Document Evidence and it closes the Elmore Hotel Investigation Case, so well done on that find!
Now Scan the painting on the back wall of this office and you will see that someone has moved it recently. Close the Scanner and move the painting and you will see the safe concealed here. Open your Scanner and Scan the safe to see that the only numbers used are 1, 4, 5 and 8. That gives you a set number of combinations to try...
Hitting X will open the safe and score you a micro-recorder which is worth reporting to Kai - and you do.
The crucial audio evidence is found in the concealed safe!
On the way back you find a bin with Burner Phones in it - that is Physical Evidence in teh Internal Affairs Case. That is also the fifth of the five pieces of evidence for this location. Head back downstairs to talk to Kai...
She is in the shipping container in the loading bay - and you share your find with her. Then she shares her find with you - more of the anime dolls. She scores the address for the store that they are sold at - and that completes the objectives for this location so you head back to the car and drive to the next location...
Same deal as before - Kai holds down the fort outside and you make your way inside. As you reach the rood Kai calls to tell you that she has received a report of a suspicious van and is going to follow it, which means you have no backup here mates...
Use your Scanner and you will spot all fhe guards - and Scan one of the Suspects - Philip Evans, who is on your Warrants List.
There is a Tactical Box on the roof with you - you can use that to first grab the silenced Sniper Rifle and take out the Alarm Box from here - that way there is no way they will be sounding an alarm!
Then you can grab the Zipline, and make your way to the other side, where you take down the first of the guards.
After you take out the outside guards use the Crowbar to get into the warehouse where you listen in on Stoddards briefing...
Remember to arrest all of the Warrant Suspects - not kill them!
First thing first, in the room you are in there is a piece of Document Evidence - a Poster for Tamu-Tamu - so Scan that. There is also a Tactical Box so you can reload your ammunition and choose more appropriate kit for this phase of the mission.
From the catwalk outside of this office Scan the bad guys to mark them, then Scan the Physical Evidence below on the shelf to obtain the Tamu-Tamu DVDs.
If you eavesdrop on the three thugs below you learn the story of how the anime got used as a money laundering source.
AFTER you take out all of the guards on the warehouse floor level, head into the office up a short flight of stairs in the corner to Scan a Document Evidence - Flyer for Tamu-Tamu - which is part of the Internal Affairs Case.
In that same office on the other desk is a piece of Document Evidence - Letter from Neltz's Business Manager -- the Scanning of which will also unlock the Achievement True Detective (25g) Complete 3 case files in single-player.
Now head downstairs and use the Crowbar to open the door - when you get in use the Scanner and you will note that there is an additional piece of Evidence to be found down here - track that to the Security Room - take out the guard there and then Scan the Crate of Hot Shot -- that is Trace Evidence for the Hot Shot Supply Chain Case and it is the final piece of evidence for this Episode.
Make your way to the Camera Station and use the controls to see the Grow House and Stoddard - as well as other thugs!
Clearly Stoddard is a major player on the drug scene
The Confrontation with Stoddard
Okay thngs go sort of pear-shaped here - for one thing you enter the back room and find Stoddard standing over a dead person. Then he saves your life, the building gets set on fire, and oh yeah, there is an entire new group of thugs attacking!
Add to that you get a mayday call from Kai and, well, you are going to have to accept Stoddard's help mates!
When you reach the mall activate your Scanner to spot all of the enemy - including Leonard Miller, one of the blokes on your Warrants list. So yeah, just like in the warehouse we are going to peel this group like a grape, taking them down from the outside in, so that we can arrest them all.
As you are taking out the thugs be sure to disable the alarm box, then use the Crowbar to open the door to get in.
Security cameras are our friend
Inside the Mall
Once you are inside use the Security Cams in the Security Station just inside the door to scan the area to see the thugs. There is a Tactical Box here you can use to re-arm and change your load-out as needed.
With Stoddard's help you rescue Kai - and then together you take down the rest of the thugs, then make your way to the exit, hopefully avoiding getting crushed by the sign parts. When you finally get outside you very physically confront Stoddard.
You hand over the evidence you found in the safe to the Captain, and he summarizes the situation -- the Captain then reveals his treachery. Oh man, it is treachery all the way around! Stoddard is bent, the Captain is bent, and Kai is bent. And they have set you up to take the fall!
Kai asks you why you did not just take the damn money?!
Stoddard then arrest YOU! Did not see that coming!
At the end of that CS you unlock the Achievement Good Guys (20g) Complete Ep. 4: Case Closed.
You lose access to your weapons at this point as you are now on your way to prison so we will assess weapon load-outs when that privilege returns.
P5: Gauntlet
We begin this Episode three years later on the prison bus, and with us being the only ones with a Warrant on us! You have a nice conversation on the bus, in which you learn that things may be worse - and better - than you thought.Tyson appears in a car next to the bus and BOOM! The bus goes bye-bye! When you wake up from your brief nap you are still shackled but are being rescued by one of the perps! He sets you free, and tells you that Tyson will meet you by the water tower.
There are several conditional Achievements for this Episode - one for stealing a Tazer from the back of a Police Car, another for not being spotted, and another for blowing up the Meth Lab. You should know about those so you can try hard to unlock them, right?
What part about meet at the water tower don't you get?
What makes this difficult is that the path you can take is very narrowly defined, so you have to take down a cop and get the Tazer as quick as you can and then use it carefully while making your way along the path that is open to you.
When you reach the building you have to go in through the window - that is the Meth Lab! Head into its basement, release the gas then light the flame and get OUT!
Blowing up the Lab unlocks the Achievement Knock Knock (25g) Blow up the Meth Lab in Ep. 5: Gauntlet.
When you blow the Lab the best route out seems to be through the hole in the side wall and up the ladder, then make your way to the porch of the house ahead as that is partly covered and protects you from the chopper.
Get the cop that is patrolling this area to walk past by throwing a rock, then Taze them, then haul butt across the street, through the lot and into the storm tunnels. Go through the narrower tunnel and out the other side, then carefully make your way towards the Tower.
When you arrive you meet up with Tyson, who fills you in on the situation... He provides yo with a light and tells you what to do with it - flash it three times fast, which you do, but then the chippers arrive!
Sure enough Tyson is waiting at the base of the water tower
You need to get to the marker on the map but, you also need to avoid being seen by either the choppers OR the patrolling cops. That means dodging from cover to cover strategically. There is really no way we can help you do that - you have to do it instinctively.
After yo hook up with Tyson again he takes you through a mine and to a waiting car where you meet up with Kai - Kai?!
You hear about what has happened in the past three years since you were locked up...
At this point you will unlock the Achievement You Probably Have Questions (20g) Complete Ep. 5: Gauntlet. If you managed to get through undetected you will also have unlocked Graceful Exit (25g) Don't get spotted in the Ep. 5: Gauntlet. If you took a Tazer from the back of a Police Car rather than by knocking out a cop, you will also have unlocked Their Own Medicine (25g) Steal a T62 CEW from the back of a police cruiser in Ep. 5: Gauntlet.
At this point you get back access to your load-out so we will cover what you SHOULD have unlocked to this point...
Pistols: 92FS / P226 / CZ-75 / G17
Heavy Pistols: 45T / M1911A1 / .40 Pro / Bald Eagle
Revolvers: .38 Snub / .357 RS / 410 Jury / 44 Magnum
Machine Pistols: 93R / G18C / TEC-9 / MAC-10
Shotguns: 37 Stakeout / 870P Magnum / SPAS-12 / Double Barrel Shotgun
SMG/PDW: MP5K / MPX / UMP 45 / P90
Sniper Bolt Action: R700 LTR
Assault Rifle: M416 / M16A3 / AKM
Carbine: RO933 / SG553
Sniper Semi-Auto: SOCOM 16 / SR-25 ECC
At this point you should have unlocked ALL of the Gadgets and the Melee. So what you will be working on from here on are the rest of the firearms.
P6: Out of Business
Okay so wow! Kai and Tyson have teamed up to get you out and help you take down Captain Dawes... Huh. And it seems Dawes is a Greedy Gus and has been really messing in his own backyard! Well hey, now that you are out of prison go ahead and pick your load-out, select the gadgets you want, and then review the Wanted List!The Suspects with Warrants for this Episode are:
KWOK, Edgar
MUN, James
OH, Ji-hun
Though really, why you should care is a bit confusing!
Oh and we resume looking for Evidence starting with this Episode too... Hey, it may be good to get back to being a cop after all that prison time, right?
Stealing the files off of the PC is a start - but where is Boomer?
As the mission begins you get treated to a video of Captain Dawes, who appears to be soliciting investors for a new business model. As Tyson and Kai lay out the facts to you, it turns out that Dawson is a bigger douche than we thought!
Kai explains to you about the case that they are working - and their informant - and Kai and you come to a sort of understanding.
The perps leave and Kai sends you inside to crack the computer - so Tyson drives up and you go in, then use your Scanner to find a Tactical Box and, on the desk, a Purchase Order for Bianchi that is your first Document Evidence for the new case, Power Play.
Inside the back office is a second Document Evidence - Letter from Kang's Wife -- which is also for Power Play. That takes care of the two pieces of evidence for this location.
Now head to the computer on that desk and insert the USB Stick. That begins the data transfer but wait!! You must have tripped a silent alarm because you got goons on the way in mates!
Make a run for the car, survive the semi ramming then fight your way through the parking lot to the replacement car. Get in and drive straight ahead into the river canal and have you your escape via that viaduct.
Lowering the Boomer!
As you drive away as fast as you can you talk with Kai over the radio or phone - whatever - and she explains you have to rescue Boomer - and gives you directions to the next location.
The Scrapyard
There is a Tactical Gear Kit in the boot of the car you are in if you need to reload and re-arm. Open your Scanner to learn that there are four more pieces of Evidence here at this location.
The easy way to do this one is to grab the Grapple as one of your gadgets then head into the building and up the stairs. Use the Scanner to spot the targets across the way, then exit the building through the front loading door, and use the Grapple to get to the top of the building across the street that is next door to the yard. At this point you should then use a silenced pistol to shoot the Alarm Box - that may get the attention of one of the goons, but what is he going to do about it??
You will have ID'd two of the Warrant subjects in the yard below - James Mun, and Ji-hun Oh. Be an idea to arrest those two, right? Actually it would be an idea to arrest ALL of them, but you may not be able to depending on how things play out.
One Laptop recovered on spec....
Whether you Taze or arrest the Suspect in the back (Mun) area make sure you search him to obtain the Document Evidence - Boomer Photo.
After you take down the remaining thugs head inside the garage to Scan the Designer Luggage - which is Trace Evidence -- then use the crane controls to lower the car and release Boomer from the boot!
Boomer gives you his keycard - or you take it depending on how you look at it - then you let yourself through the gate and go to clear the next warehouse.
Second Warehouse
Use the stairs on the right-side to enter the office, taking down the thug there. Use Scanner to mark the thugs below - including the third Warrant Suspect Kwok, and Scan from here the Physical Evidence below -- K-Pop Album.
On a workbench below is Physical Evidence -- Remote Detonator -- which is the final piece of evidence for this location.
At this point you should have unlocked the Achievement One Good Cop (25g) Reach Expert Level 15 in single-player.
You then head out the back door to find Boomers car and snag his laptop from the boot but, just as you do that a thug you did not see attacks and as you blow his head apart with his own pistol the warehouse explodes!
You then have to deal with half-dozen thugs, then make your way back to the first warehouse yard, where you face even more of the thugs before you make a run for the car in the street and discover that Boomer is in the back seat!
Oh man, that is a LOT of Coke!
You just need to escape the thugs - head straigth then left, avoid the train and when you drop into the river viaduct turn right and GO!
Once you are in the river you have to drive and avoid being shot to heck until you end up swapping seats with Tyson, at which point you hang out the window and shoot it out with the gunmen in other cars as Tyson gets you through the area and into the Metro Tunnels - at which point you have to shoot up the final car in order to escape without getting creamed by the train!
Once you do that you get a semi-resolving CS in which Boomer sets you straight on the operation, and then you end up at yet another warehouse, where you make your way to the tracks.
At this point you should Scan the area ahead to mark the thugs - and note that there are three pieces of Evidence in this location for you to find.
Now you can peel this grape from the outside in, starting from left-to-right taking down the thugs. Follow the left-hand thug into the office and take him down, then Scan the Document Evidence on the desk -- Photo of Lily Kang and Roark -- and then take out the rest of the guys in the warehouse.
Taking care of business means hitting all of the goals
Inside you will Scan Physical Evidence on one of the cars -- Bomb Under Kang's Bianchi -- then some Trace Evidence in the back of the warehouse -- Palette of Hot Shot. That concludes the evidence for this location and this Episode.
You just need to take Kang and his two guards down and then you force your way into the back room and discover a massive amount of Coke!
Tyson opts to steal the Coke - but his plan does not work out as a train sort of gets in the way... Heh. It is snowing in LA!
After that the crew hooks up with Kai and that nicely wraps up this Episode! You unlock the Achievement Snow Blind (20g) Complete Ep. 6: Out of Business.
You should have unlocked the following weapons:
Pistols: 92FS / P226 / CZ-75 / G17
Heavy Pistols: 45T / M1911A1 / .40 Pro / Bald Eagle
Revolvers: .38 Snub / .357 RS / 410 Jury / 44 Magnum
Machine Pistols: 93R / G18C / TEC-9 / MAC-10
Shotguns: 37 Stakeout / 870P Magnum / SPAS-12 / Double Barrel Shotgun
SMG/PDW: MP5K / MPX / UMP 45 / P90
Sniper Bolt Action: R700 LTR300 Knockout / AWM
Assault Rifle: M416 / M16A3 / AKM
Carbine: RO933 / SG553 / AKS-74U / G36C
Sniper Semi-Auto: SOCOM 16 / SR-25 ECC / SAIGA .308 / PTR-91
P7: Glass Houses
The Suspects with Warrants for this Episode are:BRILLER, Cameron
THOMAS, Marvin
The opening CS has Boomer working on the files from the auto lot - the idea being that you hope to find some incriminating evidence on Dawes. Boomer finds a party invite among the data, and you and Kai decide to check it out.
The next CS is Kai planting a bomb on a power box, as you make your way into the house after the power is blown.
The primary task is bugging the room - and this lamp is perfect
Once you get inside your first stop should be the office down the hall where you find some Document Evidence -- Shipping Labels -- then you make your way upstairs and plant the bug in the conference room.
Unfortunately the group arrives early and you and Kai have to duck into the closet... As you watch through the doors you see your ex-partner delivering his pitch.
In the garage you will find more Physical Evidence in the form of a White Van,
Enter the gym and use the secret panel in the wall to access the controls for the secret door to gain access to the secret room. On the wall inside is a Wall of Photos -- which qualifies as Document Evidence.
Finally after you arrest / capture Cameron Briller search his body for the final piece of Document Evidence -- Safe Combination -- to finish off this part of the location.
As the meeting unfolds you witness it yourself...
WARNING: Be sure you do NOT exit by the double doors at the far end of the house - which lead to the Terraces which is the second location - BEFORE you collect all of the Evidence from the main house because IF you do, you cannot get back.
Once you do have all the evidence collected though, it is time to hit those double doors and move on to the Terrace Location, which has both its own guards and its own set of evidence.
Before leaving through the door to the terraces open the secret room and collect the evidence there!
The Terrances
Slowly make your way down, arresting each of the thugs as you reach them. Head into the greenhouse and arrest the thug there, then Scan the Trace Evidence there -- Tanks of Tear Gas -- before finishing the thugs on this level and heading down to the level below, where you enter the shooting range.
You can optionally use the BBQ to take out the chef - which unlocks the Achievement BYOB (25g) Use the BBQ to take out the chef in Ep. 7: Glass Houses.
After you take out the thug here, search the gun room for Physical Evidence -- SWAT Flack Jackets -- and then head to the range stands and more Physical Evidence -- Box of SS190 Cartridges. Finally on the floor next to the ammo is more Physical Evidence -- Rifle Suppressors.
That wraps up all of the evidence for this location in the Episode.
Continue on your way to the Pool House, taking out the thugs along the way, making sure that you disable the Alarm Panel straight away!
Taking out the alarm box would be a very good idea...
At the marker use the Crowbar to get through the door then head upstairs and open the safe beside the bed, Scanning the Document Evidence inside -- File Inside Safe -- which completes the evidence for this location and the Episode.
Now plant the phone in the money case, then you have your confrontation with the man! In full big screen glory! He issues his threat and then Kai puts her gun to his head then pistol whips him! Woof!
Right so you just need to take cover and shoot to survive until Kai shows up.- after which you get a CS and another moment in which you come to terms - sort of...
That concludes this Episode, and unlocks the Achievement Hollyweird (20g) Complete Ep. 7: Glass Houses.
You should have unlocked the following weapons:
Pistols: 92FS / P226 / CZ-75 / G17
Heavy Pistols: 45T / M1911A1 / .40 Pro / Bald Eagle
Revolvers: .38 Snub / .357 RS / 410 Jury / 44 Magnum
Machine Pistols: 93R / G18C / TEC-9 / MAC-10
Shotguns: 37 Stakeout / 870P Magnum / SPAS-12 / Double Barrel Shotgun
SMG/PDW: MP5K / MPX / UMP 45 / P90
Sniper Bolt Action: R700 LTR300 Knockout / AWM
Assault Rifle: M416 / M16A3 / AKM
Carbine: RO933 / SG553 / AKS-74U / G36C
P8: Sovereign Land
The Suspect with a Warrant for this Episode is PRESTON, Jim. The Cases you are working on are Hot Shot Supply Chain and The Boomer Connection.The Episode begins with Tyson very impressed by the amount of damage you caused to Roark's house - the Boomer enters to celebrate the success of tracking the money. Which is traced back to Miami... To a fortress-like building.
Boomer scores you the special kit you need - an auto-safe-cracking tool -- so you head out into the bush to pick it up.
A Meeting of Enemies at the Old Missile Site
You have a moment with Boomer during the CS, and then his buddy shows up... Boomer introduces you and then you learn that you have to go to a place called The Compound - where there might be trouble...
She asks you to drive to the Compound - and you do. Along the way you hear an interesting story... Unfortunately her dad gets the drop on you - and you get taken prisoner! Oh man Boomers ex knew all along. And it turns out that Boomer is also being captured.
There is an optional Achievement for this one: A Craftsman's Tools (25g) Find your weapons in Sovereign Land before instigating combat in the trailer park.
As you make your way through the tunnels you will encounter a bloke working on the electrics. Take him down and you find a weapon and the cuff keys - hey, progress!
When you get to the first group of guys try to take the one in the area on the left out, then grab the shotgun from the table and take the four in the main room out, and recover yoru Scanner!
The community outside is a Trailer Park
Outside
Once you get outside you get a CS and decide to get your kit back...
Follow Boomer to the trailer with the radios and Scan the Document Evidence in the next room -- Bomb Blueprint.
Remember you need to get your kit back first before you start combat if you want to unlock that Achievement...
Head in through the ditch and hole in the fence, take down the guy just inside, then quickly disable the Alarm Panel and grab the Tazer from the picnic table. Take cover in the trailer on the left to find the final Hot Shot Evidence -- Hot Shot Lab -- and Scan it to complete that Case.
Make your way around the perimeter of the park to the trailer with the Tactical Box and you unlock the Achievement A Craftsman's Tools (25g) Find your weapons in Sovereign Land before instigating combat in the trailer park.
The evidence you seek is on the second level of the stacked trailers
Nicely done you! Now in theory you could just leave, but hey, there is a Wanted fella in here and besides don't you want to take out the rest of these freaks? Get a little payback? I know I DO!
After you complete taking down all of the thugs search the trailers for the rest of the evidence. In one you will find Document Evidence -- Boomer Dossier -- while in the trailer on top of the trailer you will find more Physical Evidence in the form of a Torture Room. In the same place you will find more Physical Evidence -- Cell Phone.
Be sure you search the body of the thug with the Warrant - as you will find Physical Evidence -- ATF Agent's Badge --which is appears belongs to a missing Agent! That concludes the evidence for this location.
You can pretty much leave now unless you need to search for weapons you have not yet collected (if there are any).
Boomers ex is waiting for you with a car -- and during the conversation she pulls a gun on you and tells you she is turning you in - but hey, just kidding! Then everything goes pear-shaped as you actually DO get attacked by the bad guys!
Basically you need to survive this attack and take out the attackers... After you survive the attack you get another CS with the ex...
There are jokes and then there are jokes - and some are not funny...
Before you move on get the Physical Evidence -- License Plate -- and the ATF Agent's Grave.
Drive to the airport and head inside the hanger where you will find a piece of Trace Evidence - Ricin Bomb. That completes the Boomer Case.
While Boomer looks to your new ride you are supposed to get the bot - but when you get on the roof you discover you have company! Fortunately you ALSO find an anti-aircraft gun! Hey! This should be fun!
So yeah that was totally fun but, once we get the Brute the building gets shelled! Fortunately there is a tank outside we can grab - seriously - a tank... Using the tank you have to take out some choppers - Get to the Chopper! And another tank,
After that just run to the plane and that ends the Episode!
Peace through superior firepower is a doctrine, not a philosophy
You unlock the Achievement From Their Cold Dear Hands (20g) Complete Ep. 8: Sovereign Land.
You should have unlocked the following weapons:
Pistols: 92FS / P226 / CZ-75 / G17
Heavy Pistols: 45T / M1911A1 / .40 Pro / Bald Eagle
Revolvers: .38 Snub / .357 RS / 410 Jury / 44 Magnum
Machine Pistols: 93R / G18C / TEC-9 / MAC-10
Shotguns: 37 Stakeout / 870P Magnum / SPAS-12 / Double Barrel Shotgun
SMG/PDW: MP5K / MPX / UMP 45 / K10 / P90 / UZI / FMG9
Sniper Bolt Action: R700 LTR300 Knockout / AWM
Assault Rifle: M416 / M16A3 / AKM
Carbine: RO933 / SG553 / AKS-74U / G36C
Battle Rifle: SCAR-H / HCAR
Sniper Semi-Auto: SOCOM 16 / SR-25 ECC / SAIGA .308 / PTR-91
P9: Independence Day
This Episode begins with a CS in which Kai is going over the inventory for your next heist slash mission when you come under attack! It's Stoddard and his pals - and you have gun trouble but in the end the right guys end up dead.There are two Suspects with Warrants for this one - KELLY, Dereck and STARNES, John.
Every dog has his day - and today is Stoddard's!
Right! So we are back in Miami and on a speedboat too! How Miami Vice! You are waiting for Tyson but he got lost... Finally gets to you via the computer and you head in!
When you reach the van you open the door and Boomer jumps in - and you have another conversation about whether this is really a good idea?
Tyson drops the cable and you get the C4 from Boomer, then you an Kai approach the building. You may as well arrest the pair of guards in the street - the ones in the lobby cannot see you do it. And that eliminates them.
In the alley behind the building there are two guards you take out - and near the dumpster there is some Evidence -- Box of Books.
Inside one of the guards is Dereck Kelly so it would be an idea to arrest rather than kill him, right?
Head along the left side of the building and up the stairs then take out the guard on that level, before sniping the two guards behind the desk with silenced headshots then quickly running down and arresting the Warrant Suspect.
While most plans never survive first contact this one will...
Now make your way to the Security Camera Room in back and arrest the Guard there, and then Scan the Document Evidence on the desk there -- Staffing Chart.
With the guard force now taken out try the lift to learn it is locked down - then head to the lobby security station and Scan the pad to figure out the code. Unlock the lifts and head there - and ride the lift to 20;.
Once there you need to take out the guards and Scan the evidence on the desk in back -- Letter from Chicago Politician.
After that head to the balcony taking out the guard there and then shoot the Alarm Panel with your silenced weapon before Scanning the guards below and revealing the other Warrant - John Starnes.
Now peel this grape from the outside in as you take down the guards and then once you have accomplished that start sweeping for Evidence. In the corner office upstairs is a Revenue Sketch. In an office you have to go through several doors to reach is an Email from Dawes's Computer. Collecting that email completes the Power Play Case.
In that same office is a Photograph of Dawse' Wife. Be sure to Scan that. The final evidence for this location is on the body of the Warrant Suspect - Notice of Transfer - so be sure to search him!
Now join Kai and use the Crowbar to open the door and hook up with Tyson, who you pass on the C4 to.
Sometimes you get the bear, and sometimes the bear gets you!
Tyson is on his way to deliver the package, while you and Kai head back to the private office and Crowbar the lift door to the private lift... You have another convo with Kai in which you have to reassure her and you fail.
You have your masks and breathers on and as planned the lift shaft floods!
You swim up and let yourself in, then use the tablet to open the door so Tyson can enter. You guys have a nice convo and then set the Brute working on the vault - once you find it!
While looking you Scan some evidence -- Bank Website -- and then upstairs in the bedroom a Photo of Dawes' Dying Wife. That takes care of the evidence for this location.
You open the bust by the fire and voila! Vault! Tyson hooks up the Brute and you get started waiting for the Brute to do its thing... In the meantime you get attacked by few waves of enemy and then the Brute does its thing. Sadly Tyson opens the vault and triggers a booby trap!
You have your escape on the wire -- or you TRY. But a chopper sort of messes that up and you eventually end up in the street - where you fight and run and fight some more until you reach the boat, at which point that ends the Episode.
Freeze! Err, not?
You unlock the Achievement Some Damn Fine Fireworks (20g) Complete Ep. 9: Independence Day. If you were acting fast when you swung back into the building if you shot the thugs there while swinging you unlocked Real Action Hero (25g) Kill a criminal in Independence Day from mid air after escaping the penthouse.
You should have unlocked the following weapons:
Pistols: 92FS / P226 / CZ-75 / G17
Heavy Pistols: 45T / M1911A1 / .40 Pro / Bald Eagle
Revolvers: .38 Snub / .357 RS / 410 Jury / 44 Magnum
Machine Pistols: 93R / G18C / TEC-9 / MAC-10
Shotguns: 37 Stakeout / 870P Magnum / SPAS-12 / Double Barrel Shotgun
SMG/PDW: MP5K / MPX / UMP 45 / K10 / P90 / UZI / FMG9
Sniper Bolt Action: R700 LTR300 Knockout / AWM
Assault Rifle: M416 / M16A3 / AKM
Carbine: RO933 / SG553 / AKS-74U / G36C
Battle Rifle: SCAR-H / HCAR / HK51 / SA-58 OSW
Sniper Semi-Auto: SOCOM 16 / SR-25 ECC / SAIGA .308 / PTR-91
P10: Legacy
The Episode picks up with a CS of you in the boat heading for the docks at the estate... After you dock you part company with Boomer and Kai taking Tyson to the doc.The Suspects with Warrants for this Episode are:
WHITE, Howard
FELDMAN, Lyle
FOSTER, Craig
So you totally know you are walking into a trap... There really is no question about that, right? The real question is can you turn the trap against Dawes?
The final adventure is going to be a solo one it seems...
A quick Scan ahead after you get off the boat should reveal at least two guards at the tree line. If you target them and listen to their conversation you learn what their loads are and their instructions form the pair at the tree line.
Use the plants for cover to get close to them and then when one of them kneels down, run up and flash your badge and arrest both. Inside the shed near them is a Tactical Box if you need to change your load-out.
Remember there are three Suspects with Warrants here that you do want to arrest so no indiscriminate Rambo action here, right?
Head up on the rocks where the tower is and you can Scan the compound below - ID Howard White, and the rest of the guards. You also spot the Alarm Panel and its sirens.
From left to right you should spot - in addition to Howard White - eight (8) armed guards. This is another grape we want to peel from the outside in, so look for isolated targets, sneak in and take them down.
It would be an idea to go get the silenced Sniper Rifle and take out that Alarm Panel form here...
The back way in is also the source of an Achievement
After you take out the thugs and arrest White, head into the building with the office and Scan the Document Evidence in the printer - FAX from Neil Roark - and that takes care of the evidence for this location. There is a Tactical Box nearby if you need to reload or change kit, then head for the next Icon on the map!
When you reach the rise just past another Tactical Box, Scan the guards below to ID Lyle Feldman - mark him so you don't accidentally kill him!
After you take out the guards and capture the Warrant Suspect, being sure to disable the Alarm Panels, use the Scanner to locate the next Document Evidence -- Summons from the IRS -- which is the only evidence for this location and is found in the Cabanas on the water.
That just leaves two more Documents for the entire collection. Sweet!
So at this point we can head for the marker in two ways -- the first is to head up to the compound and battle our way in, but there IS an alternative! You could instead had down to the shore on the left and, using the Grapple climb up the pair of terraces here, after taking out the two guards at the base, and thus unlock the Achievement Social Climber (25g) Find the hidden access to the mansion grounds in Ep. 10: Legacy.
There is actually a THIRD option present by the way... You see if you locate the dirt bike you can use THAT to jump into the grounds - thus unlocking the Achievement Dare Devil (25g) Jump the dirt bike into the mansion grounds in Ep. 10: Legacy.
To do that head for the small cluster of buildings with the radio tower and crane that is above the commercial compound that has a group of guards and Craig Foster -- one of the Warrant Suspects. Since Foster is there you will want to go ahead and clear out that area even though technically you can reach the crane area without doing so. We aim for complete victory so it needs to be done!
That area is the Utility Complex and it has one of the pieces of evidence we want, so if you are already above it backtrack down, otherwise start peeling this grape and taking down the thugs!
The final confrontation begins...
On a desk in a building inside the compound is the next piece of evidence -- Surveillance Log -- which you should grab after you take out the guards here and arrest the Warrant Suspect.
With that done head to the crane area and head up the ramp to the left - the bike is on the path below that little covered hut. Jump on then ride it along the path to the end to jump into the Estate and unlock the Dare Devil Achievement... Though honestly considering how many guards there are here I would have taken the back way in myself :)
Either way - no matter which choice you make - you want to take out the grunts and make your way to the office by following the markers on the map. Make your way into the house and then down to the lower level, following the marker for the evidence.
To get to the evidence you have to go all the way up to the roof to get access to a small room on it - where you can claim the Dossier on Cpt. Hector Mendoza -- which is the final piece of evidence in the collection and the taking of which unlocks the Achievement World's Greatest Detective (50g) Complete all case files in single-player.
Make your way to the marker on the map and meet up with Captain Dawes - who tells you that he is unarmed and just wants to talk...
Dawes makes his pitch - trying to appeal to what he thinks is your baser nature - then you execute his butt! Good on ya! Nice one! Saw THAT coming!
One final secret revealed...
Now go to the desk and read the paper there - that was what Dawes was writing - and he was not at all surprised you killed him!
Follow the directions and open the passage then open the vault below, and you discover that Dawes basically left you a fortune!
You unlock the Achievement Served Cold (20g) Complete Ep. 10: Legacy.
When you click to play the next Episode what you get instead is the credits... Once the credits play out you will also unlock the Achievements (depending on the difficulty you played on) Super Cop (25g) complete all single-player episodes on Veteran difficulty / Case Closed (25g) Complete all single-player episodes on Officer Difficulty.
If you arrested all of the Warrant Suspects you will have unlocked Bring 'em to Justice (25g) Capture all Warrants alive in single-player.
Completing the game will also unlock the Hardline Difficulty Setting. At this point you have also unlocked ALL of the weapons.

